This is the full developer documentation for Patchstack Docs
# Welcome to Patchstack Docs
> Patchstack is a powerful tool that helps to protect your WordPress applications from attacks and identify security vulnerabilities within all your WordPress plugins, themes, and core. It is powered by the WordPress ecosystem's most active community of ethical hackers. Patchstack is trusted by leading WordPress experts such as GoDaddy, Hostinger, Pagely, GridPane, Plesk, and others.
## Learn more
[Section titled “Learn more”](#learn-more)
[](/getting-started/start-using-patchstack/)
Get started: protect your site
[](/patchstack-plugin/patchstack-connector/introduction/)
Solutions for WordPress & Drupal
[](/api-solutions/)
API solutions for custom tools
[](/faq-troubleshooting/)
Frequently asked questions
# Patchstack API solutions
Patchstack offers two different APIs for building custom tools and integrating our data to third party solutions.
## App API
[Section titled “App API”](#app-api)
Patchstack App API can be used commercially for building custom tools and integrating third party platforms with Patchstack App; Patchstack App API enables users to run all the Patchstack App account actions remotely. For example, it allows you to retrieve protection logs, generate security reports, manage site settings, add new sites, create custom rules, and much more. This API has unlimited requests and can be used by all Developer plan users for free.
[Read more here](/api-solutions/app-api/patchstack-app-api/)
## Threat Intelligence API
[Section titled “Threat Intelligence API”](#threat-intelligence-api)
Query our vulnerability database and retrieve information about all published vulnerabilities. The Extended tier covers single-product lookups, bulk-request endpoints for multiple components in one call, the `/latest` rolling feed, and advisory-by-id detail. Custom pricing, activated on request.
[Read more here](/api-solutions/threat-intelligence-api/overview/)
# Patchstack App API
*Patchstack App API is available for the Developer and Enterprise plan users*
Patchstack App API enables users to run all the Patchstack App account actions remotely over an API. It allows you to access protection logs, generate security reports, manage site settings, add new sites, create custom rules, and much more.
What the App API does not manage
The App API manages **sites and their security** on your Patchstack account — provisioning, plugin connection, protection, reporting and site settings. It does **not** manage trials, subscriptions, plan changes or billing for your own end customers. If you are reselling Patchstack (for example through WHMCS), run trials, subscriptions and invoicing in your own billing system and use the App API purely to provision and manage the underlying sites. Your Patchstack account’s own subscription is handled separately in the Patchstack app UI.
### Documentation and endpoints
[Section titled “Documentation and endpoints”](#documentation-and-endpoints)
Find all the Patchstack App API endpoints with examples from the documentation here:
### Example use cases
[Section titled “Example use cases”](#example-use-cases)
Some example use cases for Patchstack App API are listed below:
* Integrate Patchstack to your email marketing software to send out monthly security reports to your customers.
* Integrate Patchstack inside your own product and let your customers enable (and control) Patchstack directly from your platform without them leaving your service.
* Pull IP addresses of attackers that try to exploit vulnerabilities into your DNS firewall to block them on the network layer.
* Integrate with Enterprise SIEM/SOC tools and pull vulnerability data and logs directly into it.
* Build any kind of automations with Zapier, IFTTT, etc.
### How to get Patchstack App API key?
[Section titled “How to get Patchstack App API key?”](#how-to-get-patchstack-app-api-key)
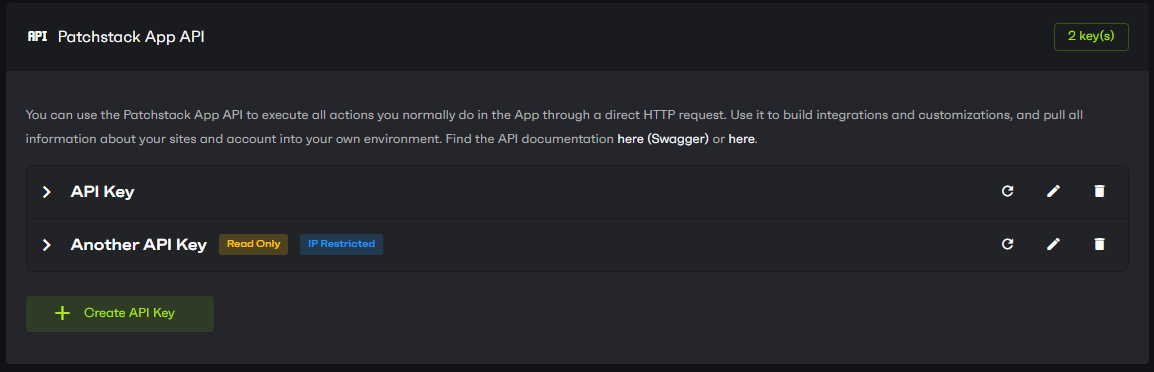
To get the API key, log in to your Patchstack account, go to account settings and navigate to the [**Integrations**](https://app.patchstack.com/settings/integrations) page. On this page, you are able to generate multiple App API keys for your account with the optional ability to:
* Bind an API key to IP addresses
* Make an API key read-only
* Set an expiration
* Rotate the API key
# Patchstack iFrame Widget
*Patchstack iframe widget is available for Enterprise plan users*
The Patchstack iframe widget is a drop-in HTML component that lets you display real-time security insights inside your own environment.
Simply plug it in your own environment and give customers deeper insights into the state of their website’s security while not giving them too much control over how Patchstack is configured on their website.
### Integration
[Section titled “Integration”](#integration)
#### Prerequisites
[Section titled “Prerequisites”](#prerequisites)
* Patchstack SaaS Enterprise plan
* [Patchstack App API key](/api-solutions/app-api/patchstack-app-api/#how-to-get-patchstack-app-api-key)
* Your own environment where you want to display the iframe
* Know how to communicate with an API
* Understand the request and response parameters of [/site/{site}/sso/generate](https://api.patchstack.com/app-api/documentation#/Widget/5a98ecb6630a39bb1649affccc030cc0)
* The Patchstack site id of the site which you want to render in the iframe widget
#### Fetching the iframe token
[Section titled “Fetching the iframe token”](#fetching-the-iframe-token)
Once you have obtained a Patchstack App API key, you can query the [/site/{site}/sso/generate](https://api.patchstack.com/app-api/documentation#/Widget/5a98ecb6630a39bb1649affccc030cc0) API endpoint in order to retrieve an access token.
This access token can be passed to a special iframe URL after which the iframe will be rendered.
* The access token is valid for 1 hour and its expiration will be pushed back by 1 hour each time it is accessed by the user through the iframe to avoid an unexpected timeout.
* You can pass the `mode` payload parameter and set it to dark or light to set the theme. It defaults to dark.
* You can pass an optional `ip_address` parameter to bind the loading of the iframe to the users’ IP address. Ensure the server generating the token knows the client’s IP or use a proxying mechanism.
#### Example integration
[Section titled “Example integration”](#example-integration)
##### Step 1: send the HTTP request
[Section titled “Step 1: send the HTTP request”](#step-1-send-the-http-request)
The following curl example assumes the site identifier is 12345 of the site for which you want to fetch the access token for the iframe. Also replace the YOUR\_APP\_API\_KEY value with your own Patchstack App API key.
```bash
curl -X POST "https://api.patchstack.com/monitor/site/12345/sso/generate" \
-H "UserToken: YOUR_APP_API_KEY"
```
##### Step 2: parse the HTTP response
[Section titled “Step 2: parse the HTTP response”](#step-2-parse-the-http-response)
The API endpoint will respond with the raw access\_token, expires\_in, and iframe\_url properties. You can use the iframe\_url property directly for the next step.
```json
[
{
"access_token": "eyJ0eXAiOiJKV1QiLCJhbGciOiJIUzI1NiJ9.eyJ1c2VyX2lkIjoxLddleHAiOjE3NDI5MDg0Nzd9.KcDgyhd8sf9xdddMHKLM258drlLrYc2rX6pN166AiEM",
"expires_in": "3600",
"iframe_url": "https://app.patchstack.com/iframe?token=eyJ0eXAiOiJKV1QiLCJhbGciOiJIUzI1NiJ9.eyJ1c2VyX2lkIjoxLddleHAiOjE3NDI5MDg0Nzd9.KcDgyhd8sf9xdddMHKLM258drlLrYc2rX6pN166AiEM"
}
]
```
##### Step 3: render the iframe widget
[Section titled “Step 3: render the iframe widget”](#step-3-render-the-iframe-widget)
Pass the iframe\_url property from step 2 directly to the `src` attribute of the iframe and you are done! A minimal iframe example is shown below.
```html
```
### Frequently asked questions
[Section titled “Frequently asked questions”](#frequently-asked-questions)
#### Can we customize the widget colors?
[Section titled “Can we customize the widget colors?”](#can-we-customize-the-widget-colors)
We recommend selecting one of the two themes provided (either dark or light). However, it is also possible to inject custom CSS. This is manually set by the Patchstack Team at this time for your particular account.
If this is needed, reach out to us and provide us with the CSS snippet to inject. Note that HTML/CSS structure and styling of the iframe widget may change over time which may affect the way your custom CSS renders the elements in the iframe widget.
#### Can we choose what information users see?
[Section titled “Can we choose what information users see?”](#can-we-choose-what-information-users-see)
No, currently the information is fixed to the views below.
#### Are the widget height and width static?
[Section titled “Are the widget height and width static?”](#are-the-widget-height-and-width-static)
No. You can define the dimensions through the iframe attributes. The width is responsive, but the height would add a scrollbar if it doesn’t fit into view.
### Screenshots
[Section titled “Screenshots”](#screenshots)
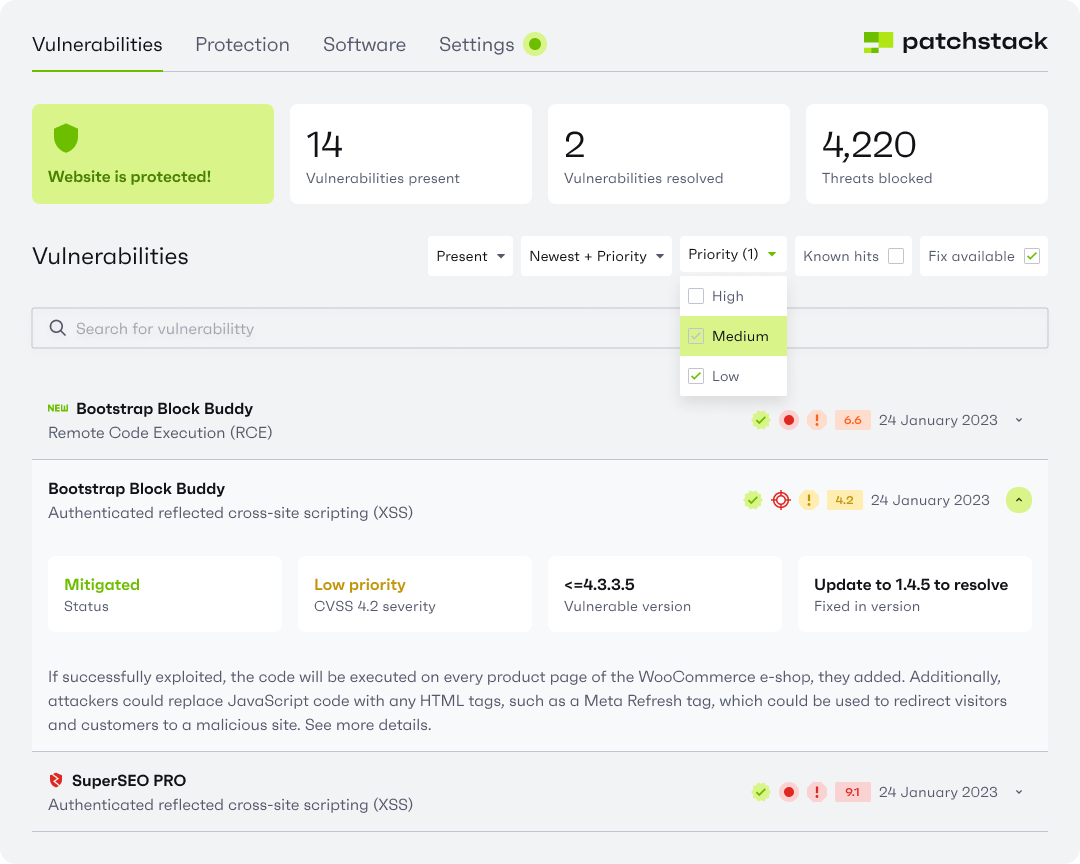
#### Vulnerabilities overview
[Section titled “Vulnerabilities overview”](#vulnerabilities-overview)
#### Software overview
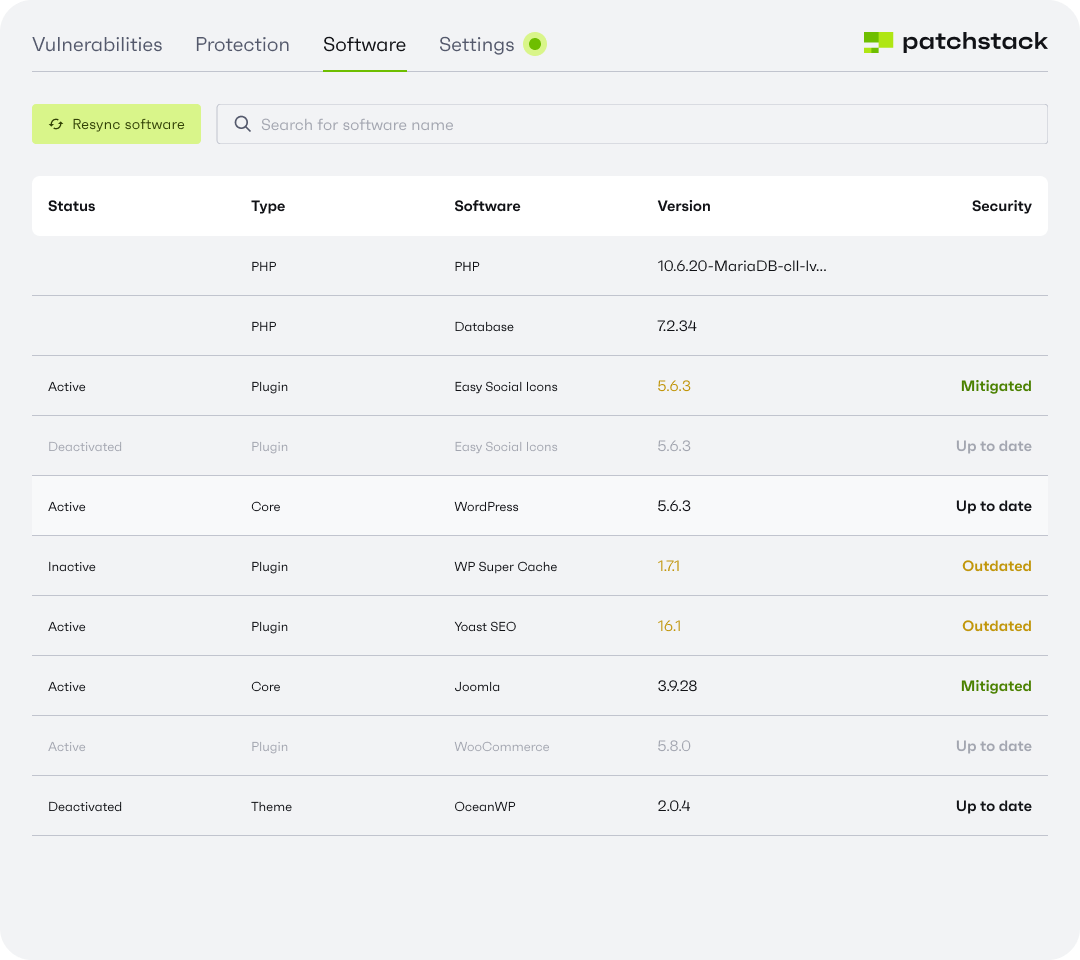
[Section titled “Software overview”](#software-overview)
#### Protection overview
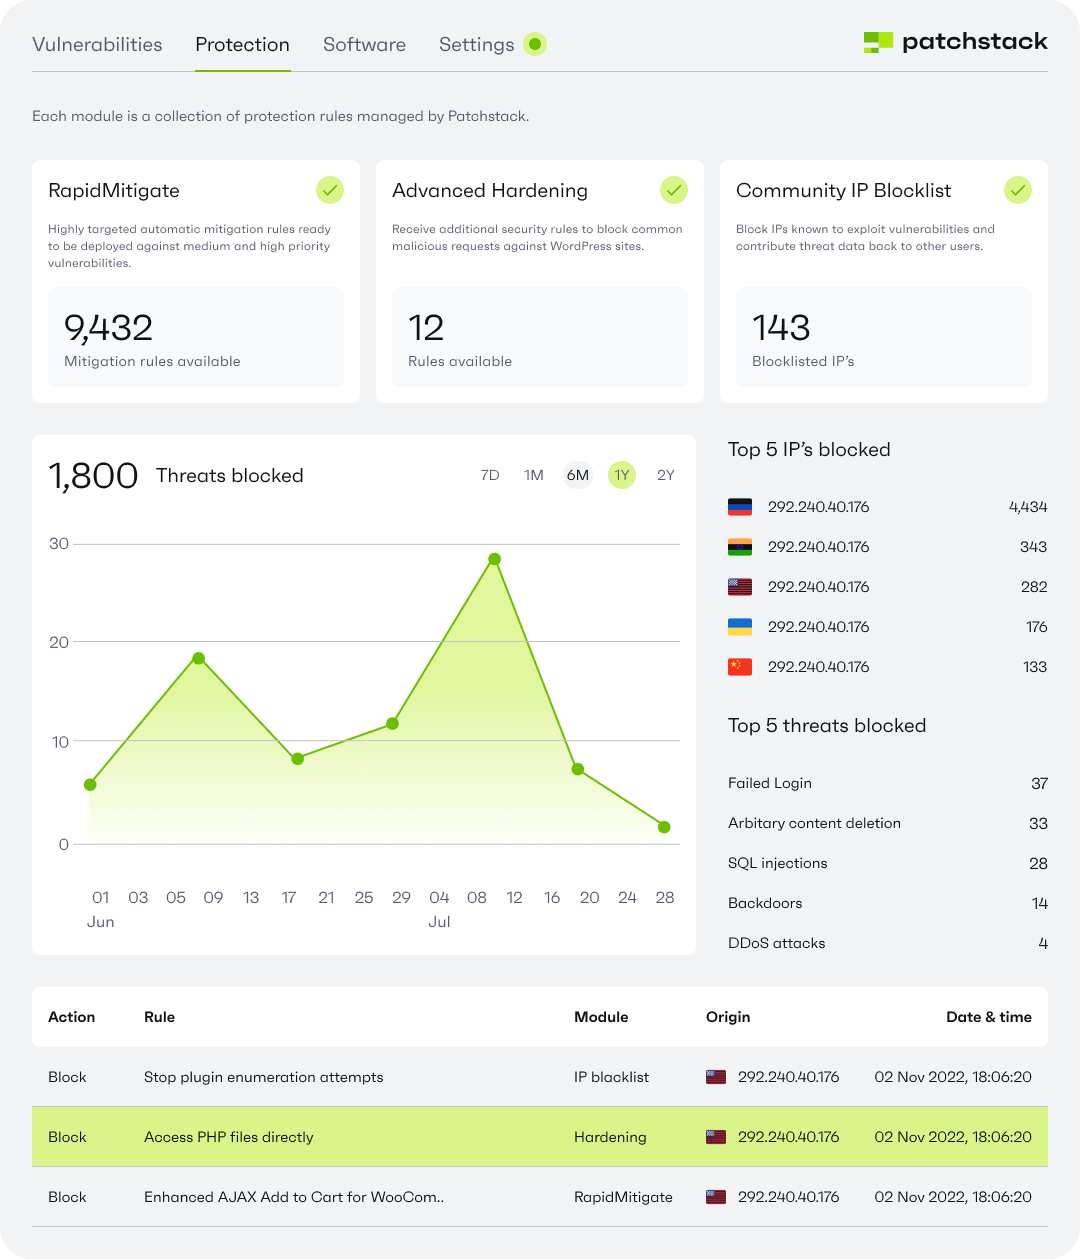
[Section titled “Protection overview”](#protection-overview)
# Patchstack Integration
Patchstack has made it extremely easy to be integrated into your workflow or control panel. This page will describe the possible ways to integrate us and what tools are needed for this.
Some of the integration steps are essential to follow, while some others entirely depend on how the internal infrastructure looks as well as available developer resources.
Note that this document is made for WordPress sites.
# Integration
[Section titled “Integration”](#integration)
## Prerequisites
[Section titled “Prerequisites”](#prerequisites)
* Patchstack Developer/Enterprise plan
* [Patchstack App API key](/api-solutions/app-api/patchstack-app-api/#how-to-get-patchstack-app-api-key)
* [Patchstack App API docs](https://api.patchstack.com/app-api/documentation)
* Know how to communicate with an API programmatically
* Local datastore to cache data to avoid HTTP overhead
## Considerations
[Section titled “Considerations”](#considerations)
##### .htaccess file
[Section titled “.htaccess file”](#htaccess-file)
The Patchstack plugin writes, by default, to the .htaccess file to apply basic protection rules (for example to prevent PHP file access in certain folders). This functionality can be turned off in 2 ways, and we recommend doing this before activating Patchstack on the site.
1. Set the constant PS\_DISABLE\_HTACCESS to true: add `define('PS_DISABLE_HTACCESS', true);` to wp-config.php
2. Set the `patchstack_disable_htaccess` WordPress option to 1, e.g. WP-CLI command: `wp option update patchstack_disable_htaccess 1`
#### IP address header
[Section titled “IP address header”](#ip-address-header)
The Patchstack plugin tries to guess in which HTTP header the web-server is storing the real IP address of the visitor and sets it to that permanently until we refresh it when we detect an environment change. This HTTP header varies a lot between hosting providers and also depends on if services such as Cloudflare are used.
If necessary, this can be set through the WordPress option `patchstack_firewall_ip_header`. This must contain the full PHP-based HTTP header. For example for Cloudflare it would be HTTP\_CF\_CONNECTING\_IP: `wp option update patchstack_firewall_ip_header HTTP_CF_CONNECTING_IP`
If the IP address header is invalid, we fallback to REMOTE\_ADDR. Note that setting it to an invalid HTTP header could make it possible for malicious users to spoof their IP address.
#### Data caching strategy
[Section titled “Data caching strategy”](#data-caching-strategy)
To minimize API calls and reduce latency when displaying site information to your users, implement a caching strategy in your local datastore. This is essential for maintaining performance and reducing strain on both your infrastructure and the Patchstack API.
#### Error handling & status codes
[Section titled “Error handling & status codes”](#error-handling--status-codes)
All Patchstack API endpoints return standard HTTP status codes. Your integration should handle these appropriately to ensure reliability and provide meaningful feedback to users. E.g. handle status codes 200, 401, 422, 500.
#### Rate limits & quotas
[Section titled “Rate limits & quotas”](#rate-limits--quotas)
* **Sites per request** — `POST /site/add` and `POST /site/exists` accept between 1 and **100 URLs** per call in the `urls` array. Split larger batches across multiple requests.
* **Listing sites** — `POST /sites/list` is paginated (`page`, `per_page`, default 20 per page); page through it when rendering large accounts. `POST /sites/list/basic` is *not* paginated — it returns the full `[{id, url}, …]` array for the account in one response, which is what makes it convenient for reconciliation.
No per-key request-rate limit
The App API does not currently enforce a per-key request-rate limit on authenticated calls. Even so, when provisioning at large scale, batch your requests considerately rather than issuing one call per site — for example, pass multiple URLs in the `urls` array on `/site/add` (and `/site/exists`) instead of looping a separate request per site.
## Flow of integration & plugin
[Section titled “Flow of integration & plugin”](#flow-of-integration--plugin)
Patchstack works by assigning an API key to a site that has been added to the Patchstack App. This API key is then used in the WordPress plugin to activate the connection to Patchstack.
The plugin takes cares of a few things, but these are most important to know:
* Uploads a list of software to the Patchstack API (SCA)
* This ensures we attach the proper mitigation rules to the site
* Uploads firewall and activity logs to the Patchstack API
* For threat intelligence purposes
* Fetches mitigation rules that will run in the plugin on each request
* We only ship the mitigation rules that the site needs for optimal performance
A possible integration can be split into 5 phases:
1. Account setup & authentication
2. Site provisioning
3. Plugin deployment
4. Default Policy & Managed By Mode
5. Management & reporting
## Integration phases
[Section titled “Integration phases”](#integration-phases)
### Step 1: Account setup & authentication
[Section titled “Step 1: Account setup & authentication”](#step-1-account-setup--authentication)
The Patchstack App API requires an API key. Refer to [this](/api-solutions/app-api/patchstack-app-api/#how-to-get-patchstack-app-api-key) page for more instructions on how to get one. Note that you can only obtain the App API key on the developer or enterprise plan.
Once the API key has been acquired, it can be used to communicate with the [Patchstack App API](https://api.patchstack.com/app-api/documentation) by setting the `UserToken` HTTP header to the value of the API key. The root URL of the Patchstack App API is `https://api.patchstack.com/monitor/`.
It’s also important to set the `Content-Type` HTTP header to `application/json` when sending request data through the body.
### Step 2: Site provisioning
[Section titled “Step 2: Site provisioning”](#step-2-site-provisioning)
When the site should be added to Patchstack depends on your use-case scenario. If they require protection immediately then you can execute this flow the moment the website environment (the WordPress site) has been created on the infrastructure. If you upsell Patchstack then this flow can be launched upon purchase or opt-in.
Using WHMCS?
If you provision Patchstack through WHMCS, the Patchstack WHMCS module handles this flow for you. See the [WHMCS setup guide](/partners/whmcs-setup/).
###### 1. Determine if the site already exists in Patchstack
[Section titled “1. Determine if the site already exists in Patchstack”](#1-determine-if-the-site-already-exists-in-patchstack)
This step is essential as it’s possible that a site may be protected already or added to Patchstack. For this, the `/site/exists` API endpoint can be utilized; it will check if a site with the given URL has already been added to Patchstack before you attempt to actually add the site to Patchstack.
The strict parameter dictates whether to do a strict check of the exact URL; avoids checking if different variants of the domain name (with and without www) and protocol (with and without http/https) is added.
```bash
curl -X 'POST' \
'https://api.patchstack.com/monitor/site/exists' \
-H 'Content-Type: application/json' \
-H 'UserToken: ' \
-d '{
"url": "https://mywebsite.com",
"strict": false
}'
```
The response will indicate whether or not the site is added already:
```json
{
"exists": false
}
```
###### 2. Add the website to Patchstack
[Section titled “2. Add the website to Patchstack”](#2-add-the-website-to-patchstack)
Once we confirm that the site has not been added already, we can add it to Patchstack to obtain an API key.
```bash
curl -X 'POST' \
'https://api.patchstack.com/monitor/site/add' \
-H 'UserToken: ' \
-H 'Content-Type: application/json' \
-d '{
"urls": [
"https://mywebsite.com"
],
"cms_id": 1
}'
```
The response will look something like below.
```json
{
"success": "Successfully added the site(s).",
"count": 1,
"sites": {
"https://mywebsite.com": {
"siteid": 12345,
"oauth": {
"id": 12333,
"secret": "DOOs9DIyv2FMcURFtkB0eXOHMRhH7I2EsaNUb4aR",
"apikey": "DOOs9DIyv2FMcURFtkB0eXOHMRhH7I2EsaNUb4aR-12333"
}
}
},
"lastid": 12345,
"oauth": {
"id": 12333,
"secret": "DOOs9DIyv2FMcURFtkB0eXOHMRhH7I2EsaNUb4aR",
"apikey": "DOOs9DIyv2FMcURFtkB0eXOHMRhH7I2EsaNUb4aR-12333"
}
}
```
The top-level `lastid` and `oauth` fields refer to the **last** site in the batch and are kept for backwards compatibility. New integrations should read from the per-URL `sites` map.
###### Bulk provisioning
[Section titled “Bulk provisioning”](#bulk-provisioning)
The `urls` parameter is an **array**, so you can provision up to **100 sites in a single `/site/add` call** rather than looping one request per site. Pass every URL in the array and the response returns one entry per URL under the `sites` map, keyed by the exact URL you sent:
```bash
curl -X 'POST' \
'https://api.patchstack.com/monitor/site/add' \
-H 'UserToken: ' \
-H 'Content-Type: application/json' \
-d '{
"urls": [
"https://site1.com",
"https://site2.com"
],
"cms_id": 1
}'
```
```json
{
"success": "Successfully added the site(s).",
"count": 2,
"sites": {
"https://site1.com": {
"siteid": 12345,
"oauth": { "id": 12333, "secret": "…", "apikey": "…-12333" }
},
"https://site2.com": {
"siteid": 12346,
"oauth": { "id": 12334, "secret": "…", "apikey": "…-12334" }
}
},
"lastid": 12346,
"oauth": { "id": 12334, "secret": "…", "apikey": "…-12334" }
}
```
Reconcile the results **by URL**: iterate the `sites` map and match each key back to the record on your side, rather than relying on array order or the top-level `lastid`. The `/site/exists` endpoint accepts the same `urls` array (up to 100) so you can pre-check a whole batch in one call before adding it. If you need to re-fetch the `{siteid, url}` mapping for every site on the account later, call [`POST /monitor/sites/list/basic`](https://api.patchstack.com/app-api/documentation) and match by URL.
###### 3. Store in local datastore
[Section titled “3. Store in local datastore”](#3-store-in-local-datastore)
Store the `siteid` and `apikey` for each URL in a datastore on your infrastructure. This avoids having to query the Patchstack App API each time you need to identify a customer’s site.
* **`siteid`** is the canonical Patchstack site identifier. It is what the portal displays and what every per-site API endpoint expects in the URL (`/site/view/{siteid}`, `/site/delete/{siteid}`, `/download/wordpress/{siteid}`, etc.). Store this if you ever need to cross-reference your records against the Patchstack portal.
* **`apikey`** is the pre-formatted plugin license key (`-`). Pass it directly to the WordPress plugin during activation — you do not need to assemble it yourself.
`siteid` and `oauth.id` are independent fields
`siteid` identifies the site, `oauth.id` identifies the OAuth credential embedded in the plugin license key. They have always been independent fields with different purposes. Do not assume they are equal — for sites provisioned before 13 May 2026 the two values often coincided as a side-effect of how rows were inserted, but they may differ for any site provisioned since.
If you previously stored `oauth.id` under the assumption it equalled the site identifier, call [`POST /monitor/sites/list/basic`](https://api.patchstack.com/app-api/documentation) to fetch `[{id, url}, …]` for every site on your account, match by URL, and update your stored values to the current `siteid`.
### Step 3: Plugin deployment
[Section titled “Step 3: Plugin deployment”](#step-3-plugin-deployment)
Now that you have the site identifier and plugin API key stored in your local datastore, you can start the flow of installing and activating the Patchstack plugin on the website.
There are 3 possible ways to do this:
* Through [WP-CLI](https://wp-cli.org/)
* Fully automatic process
* Recommended approach
* Downloading pre-configured Patchstack plugin
* Semi-automatic depending on integration
* Not recommended → might interfere with file integrity checks
* Manually downloading, installing and activating Patchstack
* Fully manual process
* Not recommended → not automated
###### Through WP-CLI
[Section titled “Through WP-CLI”](#through-wp-cli)
With the WP-CLI, we need to execute 2 commands to get the Patchstack plugin running and activated.
First we execute the command below to install and activate the Patchstack plugin:
`wp plugin install patchstack --activate`
Then we execute the command below to activate the connection to Patchstack. It is important to inject the plugin API key (`apikey` from step 2) here:
`wp patchstack activate DOOs9DIyv2FMcURFtkB0eXOHMRhH7I2EsaNUb4aR-12333`
This command will return `The Patchstack plugin has been successfully connected.` if it succeeded.
###### Downloading pre-configured Patchstack plugin
[Section titled “Downloading pre-configured Patchstack plugin”](#downloading-pre-configured-patchstack-plugin)
The pre-configured Patchstack plugin simply has the plugin API key injected into the /patchstack/patchstack.php file. This API key will be used when the plugin is being activated and we detect that this injected API key is present and Patchstack has not been activated yet.
It can be downloaded through the [/download/wordpress/{site}](https://api.patchstack.com/app-api/documentation#/Plugin%20Download/54ec70b2b389dc50b18e4bcfeaf17aab) API endpoint.
```bash
curl -X 'GET' \
'https://api.patchstack.com/monitor/download/wordpress/12345' \
-H 'Accept: */*' \
-H 'UserToken: ' \
```
This will serve a binary .zip file which you can download after which there are 2 options:
1. Option 1: Upload, install and activate the plugin manually through /wp-admin/.
2. Option 2: Unzip into /wp-content/plugins/ so it’s unzipped as /wp-content/plugins/patchstack/, then activate it manually through /wp-admin/ or programmatically activate through [custom code](https://developer.wordpress.org/reference/functions/activate_plugin/) of your own.
Note that because we inject the API key into the file, it could fail file integrity checks.
###### Manually downloading, installing and activating Patchstack
[Section titled “Manually downloading, installing and activating Patchstack”](#manually-downloading-installing-and-activating-patchstack)
Another way to install the Patchstack plugin is from WordPress itself.
1. In the WordPress admin area, navigate to **Plugins** > **Add New** > Type “Patchstack” to search.
2. Install and activate the plugin
3. Copy the API key from there
4. Go to your WordPress admin, navigate to **Settings** > **Security** and insert the API key there
### Step 4: Default Policy & Managed By Mode
[Section titled “Step 4: Default Policy & Managed By Mode”](#step-4-default-policy--managed-by-mode)
As an enterprise customer, you will have access to some features that allows you to customize some functionality of Patchstack.
###### Default Policy
[Section titled “Default Policy”](#default-policy)
It is possible that you may want certain options in Patchstack disabled, or enabled, by default upon activation of the Patchstack plugin on the website. This is possible with a default policy. To read more about default policy functionality, please head to [this documentation page](/patchstack-app/sites/policy/).
###### Managed By Mode
[Section titled “Managed By Mode”](#managed-by-mode)
The managed by mode allows you to set text (HTML) that is shown to your customers when they access the Patchstack settings page on /wp-admin/ → Settings → Security. This can be used to show who manages or maintains the Patchstack security integration or who they should contact/email for any support. For more information on the managed by mode, head to the [this documentation page](/patchstack-app/account-settings/managed-mode/).
### Step 5: Management & reporting
[Section titled “Step 5: Management & reporting”](#step-5-management--reporting)
Once Patchstack has been activated on a site, it will upload the software list to the Patchstack API and fetch the mitigation rules for any vulnerabilities present on the website which need protection.
Now it is important to show the value of Patchstack to the customer, and this can be done through 2 ways:
1. You fetch data from the Patchstack App API and display this in your environment
2. You embed our iframe widget
###### Fetching data
[Section titled “Fetching data”](#fetching-data)
We have a large list of API endpoints to use where you can fetch information of a site. Some noteworthy ones are [listed below](/api-solutions/app-api/patchstack-integration/#noteworthy-api-endpoints) as well as here:
* [Fetch basic information](https://api.patchstack.com/app-api/documentation#/Sites/d246365f4afc2083b225e4cf2ae84632)
* Vulnerability counters (how many present, mitigated and resolved), total threats blocked, total software counters and how many are vulnerable/outdated
* Attacks blocked over past 7 days
* [Fetch vulnerabilities present](https://api.patchstack.com/app-api/documentation#/Dashboard/8a6e3f514edd9f267812dc853398e716)
* All vulnerabilities of a site
* Information about each individual vulnerability such as: is it fixed, is it exploited, does it have protection, what is the severity
* [Fetch firewall statistics](https://api.patchstack.com/app-api/documentation#/Firewall/edd0582b9e216543afc1ebe7c70f3526)
* Fetch the total threats blocked (grouped by day) over a given period of days or timeframe
###### Embedding iframe widget
[Section titled “Embedding iframe widget”](#embedding-iframe-widget)
The Patchstack iframe widget is a drop-in HTML component that lets you display real-time security insights inside your own environment.
Simply plug it in your own environment and give customers deeper insights into the state of their website’s security while not giving them too much control over how Patchstack is configured on their website.
[Click here for integration and more information](/api-solutions/app-api/patchstack-iframe/)
## Site lifecycle: removing & re-adding sites
[Section titled “Site lifecycle: removing & re-adding sites”](#site-lifecycle-removing--re-adding-sites)
###### Removing a site
[Section titled “Removing a site”](#removing-a-site)
To remove a site from the account — for example when a customer cancels or you clean up a never-activated site — call the delete endpoint with the `siteid` you stored in step 2. The path is `/site/delete/{siteid}` and it accepts both `DELETE` and `POST`.
```bash
curl -X 'DELETE' \
'https://api.patchstack.com/monitor/site/delete/12345' \
-H 'UserToken: ' \
-H 'Content-Type: application/json'
```
```json
{
"success": "Successfully deleted the site."
}
```
To also uninstall the Patchstack plugin from the remote WordPress site as part of the deletion, send `{"delete": true}` in the request body. To remove several sites at once, call `DELETE /site/delete` with a body of `{"sites": [12345, 12346]}`.
Plugin removal on site deletion
Deleting a site with the `delete` flag also attempts to remove the Patchstack plugin from the connected WordPress site. This remote removal is best-effort and may not complete if the site connection is unstable, or if the plugin has already been deactivated or disconnected (but not deleted). For reliable removal, manage the plugin directly on the site with WP-CLI (for example `wp plugin delete patchstack`) rather than relying on the remote deletion.
Deleting a site is destructive and permanent
There is **no paused or suspended state** in Patchstack. Deleting a site removes it and its data, and it stops counting toward your plan. If you later re-add the same URL with `/site/add`, Patchstack provisions a **brand-new site** with **new `siteid` and new OAuth credentials** (a new plugin `apikey`) — the previous credentials are not restored. Any integration that “suspends” and “resumes” a site must therefore delete on suspend and re-provision + re-activate the plugin on resume, then overwrite the stored `siteid`/`apikey` with the new values.
###### Cleaning up never-activated sites
[Section titled “Cleaning up never-activated sites”](#cleaning-up-never-activated-sites)
A site that was provisioned but whose plugin never connected will report `{"activated": false}` from [`GET /site/plugin/installed/{siteid}`](https://api.patchstack.com/app-api/documentation#/Sites/d932033c445ab06e5fd2dcb6ea8eead3). Combine that check with the delete endpoint above to periodically prune sites that were added but never came online. See the [FAQ](#how-to-determine-if-a-site-has-been-activated-and-is-connected) for the difference between the `plugin/installed` and `state` checks.
## Noteworthy API endpoints
[Section titled “Noteworthy API endpoints”](#noteworthy-api-endpoints)
The list below are noteworthy API endpoints that might be interesting to our partners.
* Individual site actions
* [Check if site is added already to Patchstack](https://api.patchstack.com/app-api/documentation#/Sites/886038a2314a8571082e209b901b12e6)
* Pass full URL of site to check in url parameter.
* Consider `strict` parameter: Whether to do a strict check of the exact URL; avoids checking if different variants of the domain name (with and without www) and protocol (with and without http/https) is added.
* [Add site](https://api.patchstack.com/app-api/documentation#/Sites/565eeffd1616c74665d439a4d77bca4b)
* Pass full URL of site to be added in urls parameter.
* Returns the site id (lastid) and API key in the response.
* [Verify installation](https://api.patchstack.com/app-api/documentation#/Sites/d932033c445ab06e5fd2dcb6ea8eead3)
* Pass site id in URL.
* Internally this checks if we received the software list from the plugin to the API.
* [Delete site](https://api.patchstack.com/app-api/documentation#/Sites/3ebcb454c2ad6d4098a541c4c5d939be)
* Pass site id in URL.
* [Fetch basic information](https://api.patchstack.com/app-api/documentation#/Sites/d246365f4afc2083b225e4cf2ae84632)
* Pass site id in URL.
* [Fetch vulnerabilities](https://api.patchstack.com/app-api/documentation#/Dashboard/8a6e3f514edd9f267812dc853398e716)
* Pass site id in URL.
* [Fetch firewall statistics](https://api.patchstack.com/app-api/documentation#/Firewall/edd0582b9e216543afc1ebe7c70f3526)
* Pass site id in site\_id parameter
* [Fetch software](https://api.patchstack.com/app-api/documentation#/Sites/e411201c74ee4c5e3cd63ebdfb89e7bd)
* Pass site id in URL.
* [Get plugin options](https://api.patchstack.com/app-api/documentation#/Sites/928070df689d005b52578154096f553a)
* Pass site id in URL.
* [Save plugin options](https://api.patchstack.com/app-api/documentation#/Sites/027e257bf17851530dc90fcbe6492f57)
* Pass site id in URL.
* Global actions
* [Search for sites added under the account](https://api.patchstack.com/app-api/documentation#/Sites/36abb3f0d63e821c888326568c712073)
## Frequently asked questions
[Section titled “Frequently asked questions”](#frequently-asked-questions)
### How to determine if a site has been activated and is connected?
[Section titled “How to determine if a site has been activated and is connected?”](#how-to-determine-if-a-site-has-been-activated-and-is-connected)
Utilize the [/site/plugin/installed/{site}](https://api.patchstack.com/app-api/documentation#/Sites/d932033c445ab06e5fd2dcb6ea8eead3) API endpoint in order to determine if a site has been connected and has done its first software synchronization. This will return true if we have a software list present, but does not check the latest ping status.
```bash
curl -X 'GET' \
'https://api.patchstack.com/monitor/site/plugin/installed/12345' \
-H 'UserToken: ' \
```
Which outputs the following:
```json
{
"activated": true
}
```
### How to determine if a site is still connected to Patchstack?
[Section titled “How to determine if a site is still connected to Patchstack?”](#how-to-determine-if-a-site-is-still-connected-to-patchstack)
Utilize the [/site/state/{site}](https://api.patchstack.com/app-api/documentation#/Sites/a6ef118c851ff44736580ac25a68a5a8) API endpoint in order to determine if a site is still connected and has pinged the Patchstack API any time recently.
```bash
curl -X 'GET' \
'https://api.patchstack.com/monitor/site/state/12345' \
-H 'UserToken: ' \
```
Which outputs the following:
```json
{
"activated": true
}
```
### What’s the difference between `siteid` and `oauth.id`? Can I assume they’re equal?
[Section titled “What’s the difference between siteid and oauth.id? Can I assume they’re equal?”](#whats-the-difference-between-siteid-and-oauthid-can-i-assume-theyre-equal)
They are two independent fields with different purposes — do not assume they are equal.
* **`siteid`** is the canonical Patchstack site identifier. It is what the portal displays and what every per-site API endpoint expects (e.g. `/site/view/{siteid}`, `/site/delete/{siteid}`, `/download/wordpress/{siteid}`). Store this for cross-referencing your records against the Patchstack portal.
* **`oauth.id`** is the OAuth credential identifier. Its only purpose is to form the plugin license key, which the `/site/add` response already returns pre-formatted as `apikey` (`-`). You never need to read `oauth.id` as a standalone value — just pass `apikey` to the plugin.
For sites provisioned before 13 May 2026, `siteid` and `oauth.id` coincidentally held the same value because of how rows were inserted in our database. They may differ for any site provisioned since. If you previously stored `oauth.id` under the assumption it equalled the site identifier, see the [callout in step 2 of integration](#3-store-in-local-datastore) for how to reconcile your stored values.
### How can I reconcile site IDs in my datastore against the Patchstack portal?
[Section titled “How can I reconcile site IDs in my datastore against the Patchstack portal?”](#how-can-i-reconcile-site-ids-in-my-datastore-against-the-patchstack-portal)
Call [`POST /monitor/sites/list/basic`](https://api.patchstack.com/app-api/documentation) with the same `UserToken` you use for `/site/add`. It returns `[{id, url}, …]` for every site on your account, where `id` is the current `siteid`. Match by URL and update your stored values.
```bash
curl -X 'POST' \
'https://api.patchstack.com/monitor/sites/list/basic' \
-H 'UserToken: ' \
```
# API properties
*This document will provide information on the properties of the different endpoints as part of the API of the vulnerability database and will also provide an example on a potential integration to match the result set against WordPress software.*
*These examples will be shown using PHP, but can easily be implemented using any programming language. If you have any questions, feel free to send an email to .*
## Data Structure
[Section titled “Data Structure”](#data-structure)
Some of the JSON properties as part of the result set can be null so it is important to handle these properties accordingly. Note that we may speak of “product” in the result set, which is essentially the same as a “component”.
This is JSON example for 1 plugin, 1 theme and 1 WordPress core vulnerability.
```json
{
"vulnerabilities": [
{
"id": 8728,
"product_id": 497,
"title": "WordPress Ninja Forms plugin <= 3.6.10 - Unauthenticated PHP Object Injection vulnerability",
"description": "Unauthenticated PHP Object Injection vulnerability discovered in WordPress Ninja Forms plugin (versions <= 3.6.10).",
"disclosure_date": "2022-06-15 14:46:03",
"disclosed_at": "2022-06-15T14:46:03+00:00",
"created_at": "2022-06-17T09:00:05+00:00",
"url": "wordpress-ninja-forms-plugin-3-6-10-unauthenticated-php-object-injection-vulnerability",
"product_slug": "ninja-forms",
"product_name": "Ninja Forms",
"product_name_premium": null,
"product_type": "Plugin",
"vuln_type": "PHP Object Injection",
"cvss_score": 9.8,
"cve": [],
"is_exploited": false,
"patch_priority": 3,
"affected_in": "<= 3.6.10",
"fixed_in": "3.6.11",
"patched_in_ranges": [
{
"from_version": "3.0",
"to_version": "3.0.34.1",
"fixed_in": "3.0.34.2"
},
{
"from_version": "3.1",
"to_version": "3.1.9",
"fixed_in": "3.1.10"
},
{
"from_version": "3.2",
"to_version": "3.2.27",
"fixed_in": "3.2.28"
},
{
"from_version": "3.3",
"to_version": "3.3.21.3",
"fixed_in": "3.3.21.4"
},
{
"from_version": "3.4",
"to_version": "3.4.34.1",
"fixed_in": "3.4.34.2"
},
{
"from_version": "3.5",
"to_version": "3.5.8.3",
"fixed_in": "3.5.8.4"
}
],
"direct_url": "https://patchstack.com/database/vulnerability/ninja-forms/wordpress-ninja-forms-plugin-3-6-10-unauthenticated-php-object-injection-vulnerability"
},
{
"id": 5793,
"product_id": 3547,
"title": "WordPress WooRockets Nitro premium theme <= 1.7.9 - Unauthenticated Arbitrary Plugin Installation vulnerability",
"description": "Unauthenticated Arbitrary Plugin Installation vulnerability discovered by Brad Patton in WordPress WooRockets Nitro premium theme (versions <= 1.7.9).",
"disclosure_date": "2021-11-03 00:00:00",
"disclosed_at": "2021-11-03T00:00:00+00:00",
"created_at": "2022-01-06T15:31:02+00:00",
"url": "wordpress-woorockets-nitro-premium-theme-1-7-9-unauthenticated-arbitrary-plugin-installation-vulnerability",
"product_slug": "wr-nitro",
"product_name": "WooRockets Nitro",
"product_name_premium": null,
"product_type": "Theme",
"vuln_type": "Other Vulnerability Type",
"cvss_score": 8.2,
"cve": [],
"patch_priority": 3,
"affected_in": "<= 1.7.9",
"fixed_in": "",
"patched_in_ranges": [],
"direct_url": "https://patchstack.com/database/vulnerability/wr-nitro/wordpress-woorockets-nitro-premium-theme-1-7-9-unauthenticated-arbitrary-plugin-installation-vulnerability"
},
{
"id": 5814,
"product_id": 8,
"title": "WordPress <= 5.8.2 - Authenticated Object Injection in Multisites",
"description": "Authenticated Object Injection in Multisites discovered by Simon Scannell (SonarSource) in WordPress (versions <= 5.8.2).",
"disclosure_date": "2022-01-06 00:00:00",
"disclosed_at": "2022-01-06T00:00:00+00:00",
"created_at": "2022-01-07T15:05:04+00:00",
"url": "wordpress-5-8-2-authenticated-object-injection-in-multisites",
"product_slug": "wordpress",
"product_name": "WordPress",
"product_name_premium": null,
"product_type": "WordPress",
"vuln_type": "Other Vulnerability Type",
"cvss_score": 6.6,
"cve": [
"2022-21663"
],
"is_exploited": false,
"patch_priority": 2,
"affected_in": "<= 5.8.2",
"fixed_in": "5.8.3",
"patched_in_ranges": [
{
"from_version": "5.8",
"to_version": "5.8.2",
"fixed_in": "5.8.3"
},
{
"from_version": "5.7",
"to_version": "5.7.4",
"fixed_in": "5.7.5"
},
{
"from_version": "5.6",
"to_version": "5.6.6",
"fixed_in": "5.6.7"
},
{
"from_version": "5.5",
"to_version": "5.5.7",
"fixed_in": "5.5.8"
},
{
"from_version": "5.4",
"to_version": "5.4.8",
"fixed_in": "5.4.9"
},
{
"from_version": "5.3",
"to_version": "5.3.10",
"fixed_in": "5.3.11"
},
{
"from_version": "5.2",
"to_version": "5.2.13",
"fixed_in": "5.2.14"
},
{
"from_version": "5.1",
"to_version": "5.1.11",
"fixed_in": "5.1.12"
},
{
"from_version": "5.0",
"to_version": "5.0.14",
"fixed_in": "5.0.15"
},
{
"from_version": "4.9",
"to_version": "4.9.18",
"fixed_in": "4.9.19"
},
{
"from_version": "4.8",
"to_version": "4.8.17",
"fixed_in": "4.8.18"
},
{
"from_version": "4.7",
"to_version": "4.7.21",
"fixed_in": "4.7.22"
},
{
"from_version": "4.6",
"to_version": "4.6.21",
"fixed_in": "4.6.22"
},
{
"from_version": "4.5",
"to_version": "4.5.24",
"fixed_in": "4.5.25"
},
{
"from_version": "4.4",
"to_version": "4.4.25",
"fixed_in": "4.4.26"
},
{
"from_version": "4.3",
"to_version": "4.3.26",
"fixed_in": "4.3.27"
},
{
"from_version": "4.2",
"to_version": "4.2.30",
"fixed_in": "4.2.31"
},
{
"from_version": "4.1",
"to_version": "4.1.33",
"fixed_in": "4.1.34"
},
{
"from_version": "4.0",
"to_version": "4.0.33",
"fixed_in": "4.0.34"
},
{
"from_version": "3.9",
"to_version": "3.9.34",
"fixed_in": "3.9.35"
},
{
"from_version": "3.8",
"to_version": "3.8.36",
"fixed_in": "3.8.37"
},
{
"from_version": "3.7",
"to_version": "3.7.36",
"fixed_in": "3.7.37"
}
],
"direct_url": "https://patchstack.com/database/vulnerability/wordpress/wordpress-5-8-2-authenticated-object-injection-in-multisites"
}
]
}
```
* **id → integer**
* Holds the unique numeric identifier of the vulnerability
* **product\_id → integer**
* Holds the unique numeric identifier of the product
* **title → string**
* The title of the vulnerability, including the product name, version, and vulnerability type
* **description → string**
* A short description about the vulnerability
* **disclosure\_date → datetime → YYYY-MM-DD HH:MM:SS**
* Date of when the vulnerability was publicly disclosed
* **disclosed\_at → datetime → ISO 8601 format**
* Date of when the vulnerability was publicly disclosed
* **created\_at → datetime → ISO 8601 format**
* Date of when the vulnerability was created and added to the database
* **url → string**
* The slug of the vulnerability which is used for the URL
* **product\_slug → string**
* The slug of the product
* The slug will be in lowercase, so make sure to convert your own slugs to lowercase before doing any comparison to this property
* **product\_name → string**
* The title / name of the product
* **product\_name\_premium → string → nullable**
* The title / name of the product
* This is used in rare scenarios where a developer of a plugin has 2 versions of their plugin but with the same slug but different product names.
* **product\_type → string**
* The type of the product. Can be Plugin, Theme or WordPress
* **vuln\_type → string**
* The vulnerability type, some examples are SQL Injection and Cross Site Scripting
* **cvss\_score → decimal → nullable**
* The CVSS score of the vulnerability, between 1 and 10. Can be null, the older vulnerabilities in the database have not been classified yet.
* **cve → array of strings → can be an empty array**
* Contains an array of CVE ID’s bound to the vulnerability. One vulnerability could have multiple CVE ID’s. There are also vulnerabilities without CVE ID’s.
* **affected\_in → string**
* The versions which are affected by this vulnerability.
* Formats:
* <= x.x.x (affecting versions up to and including)
* < x.x.x (affecting versions up to)
* x.x.x-x.x.x (affecting a specific range of versions, inclusive)
* x.x.x,x.x.x (affecting specific versions)
* x.x.x (affecting one version)
* WordPress does not force plugin developers to stick to a certain versioning format. There are versions out there in an unusual format which is out of our control. Some plugins use a version in the form of a date such as 20220202, some use letters such as 2.0.2a, some just keep adding a number to the version e.g. 4.0000002. However, for the most part it’s in the usual format of x.x.x or x.x or x.x.xx
* **fixed\_in → string → can be empty**
* The oldest version which has the vulnerability fixed
* This can be empty, which implies that we have not recorded a fixed version for this vulnerability yet
* **patched\_in\_ranges → array of strings → can be an empty array**
* In case the WordPress core, plugin or theme have patched sub-versions, this will hold an array of versions in the format of:
* from\_version → string
* Starting version, inclusive
* to\_version → string
* Ending version, inclusive
* fixed\_in → string
* The version which has the patch applied
* You see this often in WordPress core vulnerabilities as they still support older versions such as 5.1, 5.2, 5.3, etc. Bigger plugins such as WooCommerce and Ninja Forms also do this.
* **direct\_url → string**
* The direct URL of the vulnerability hosted at the Patchstack database frontend.
* **is\_exploited → boolean**
* Whether or not the vulnerability is known to be exploited by Patchstack
* **patch\_priority → integer → nullable**
* The patch priority value of the vulnerability which implies how soon the developer needs to patch the vulnerability and how soon the customers need to be protected.
* NULL = unknown
* 1 = Low → patch within 30 days
* 2 = Medium → patch within 7 days
* 3 or higher = High → patch immediately
## Implementation
[Section titled “Implementation”](#implementation)
Since some of these properties must be kept in mind while determining if a component is vulnerable or not, we have an example PHP script below which will explain the flow. In particular, the following properties must be used: product\_slug, product\_name\_premium, affected\_in, patched\_in\_ranges.
Note that it is an example implementation and should not be copied 1:1 for internal use, you’ll likely want to call the /all API endpoint using a different HTTP library and store the JSON response somewhere else (such as a memory based cache). The example will utilize Laravel’s collect function and Guzzle. The composer.json file which was used for this example is also included below.
```json
{
"require": {
"illuminate/collections": "^8.83",
"guzzlehttp/guzzle": "7.0"
}
}
```
```php
where('product_slug', $slug)->where('product_type', getProductType($type));
if ($vulns->count() === 0) {
return false;
}
// Now we will loop through the vulnerabilities and return upon the first match.
foreach ($vulns as $vuln) {
// Get the current version, remove "v" as some components put this in place.
$currentVersion = str_replace('v', '', strtolower($currentVersion));
// The patched in ranges hold priority.
if (count($vuln['patched_in_ranges']) > 0) {
// Loop through all the present ranges.
foreach ($vuln['patched_in_ranges'] as $range) {
if (version_compare($currentVersion, $range['from_version'], '>=') && version_compare($currentVersion, $range['to_version'], '<=') && isMatchingName($name, $vuln['product_name_premium'])) {
return true;
}
}
// If the patched in ranges exist and no match was made, we assume it's a fixed in the given version at this point.
continue;
}
// Ignore empty affected in version, should never happen but best to catch it.
$affectedIn = trim($vuln['affected_in']);
if (empty($affectedIn)) {
continue;
}
// Match against <= or <.
if (strpos($affectedIn, '<= ') !== false || strpos($affectedIn, '< ') !== false) {
$t = explode(' ', $affectedIn);
$comparison = $t[0];
$version = $t[1];
if (version_compare($currentVersion, $version, $comparison) && isMatchingName($name, $vuln['product_name_premium'])) {
return true;
}
continue;
}
// Match against versions separated by commas.
if (strpos($affectedIn, ',') !== false) {
$versions = explode(',', $affectedIn);
foreach ($versions as $version) {
$version = trim($version);
if ($version == $currentVersion && isMatchingName($name, $vuln['product_name_premium'])) {
return true;
}
}
continue;
}
// Match against a range of versions.
if (strpos($affectedIn, '-') !== false) {
$t = explode('-', $affectedIn);
$start = $t[0];
$end = $t[1];
if (version_compare($currentVersion, $start, '>=') && version_compare($currentVersion, $end, '<=') && isMatchingName($name, $vuln['product_name_premium'])) {
return true;
}
continue;
}
// Otherwise we are likely matching against one single version.
if ($currentVersion == $affectedIn && isMatchingName($name, $vuln['product_name_premium'])) {
return true;
}
}
return false;
}
/**
* If the premium field is filled in, match if it equals.
* If it's empty, we will always return true.
*
* @param string $name
* @param mixed $premiumName
* @return bool
*/
function isMatchingName(string $name, mixed $premiumName): bool
{
if (empty($premiumName)) {
return true;
}
return $name === $premiumName;
}
/**
* Convert the product type to how it's stored in the API.
*
* @param string $type
* @return string
*/
function getProductType(string $type): string
{
switch (strtolower($type)) {
case 'plugin':
return 'Plugin';
case 'theme':
return 'Theme';
case 'wordpress':
return 'WordPress';
default:
return 'Plugin';
}
}
// Send the HTTP request, you'll likely want to cache this for an hour at a minimum.
if (!file_exists('db.cache')) {
try {
$client = new Client([
'base_uri' => 'https://patchstack.com/database/api/v2/'
]);
$response = $client->request('GET', 'all', [
'headers' => [
'PSKey' => ''
]
]);
file_put_contents('db.cache', (string) $response->getBody());
} catch (\Throwable $e) {
echo $e->getMessage();
exit;
}
}
// Get the vulnerabilities from the cache.
$vulnerabilities = json_decode(file_get_contents('db.cache'), true)['vulnerabilities'];
// Turn it into a collection.
$vulnerabilities = collect($vulnerabilities);
// The component we want to check, this is taken from your own dataset.
$component = [
'name' => 'Ninja Forms', // The name of the component
'slug' => 'ninja-forms', // The slug of the component
'version' => '3.6.9', // The current version of the component
'type' => 'plugin' // The component type
];
// Should return true.
var_dump(isVulnerable($component['name'], $component['slug'], $component['version'], $component['type'], $vulnerabilities));
// Should return false.
$component['version'] = '3.6.10';
var_dump(isVulnerable($component['name'], $component['slug'], $component['version'], $component['type'], $vulnerabilities));
// The component we want to check, this is taken from your own dataset.
$component = [
'name' => 'WooRockets Nitro', // The name of the component
'slug' => 'wr-nitro', // The slug of the component
'version' => '1.7.5', // The current version of the component
'type' => 'theme' // The component type
];
// Should return true.
var_dump(isVulnerable($component['name'], $component['slug'], $component['version'], $component['type'], $vulnerabilities));
// Should return false.
$component['version'] = '1.7.10';
var_dump(isVulnerable($component['name'], $component['slug'], $component['version'], $component['type'], $vulnerabilities));
// The component we want to check, this is taken from your own dataset.
$component = [
'name' => 'WordPress', // The name of the component
'slug' => 'wordpress', // The slug of the component
'version' => '5.8.2', // The current version of the component
'type' => 'wordpress' // The component type
];
// Should return true.
var_dump(isVulnerable($component['name'], $component['slug'], $component['version'], $component['type'], $vulnerabilities));
// Should return false.
$component['version'] = '5.8.3';
var_dump(isVulnerable($component['name'], $component['slug'], $component['version'], $component['type'], $vulnerabilities));
// Should return true.
$component['version'] = '5.9';
var_dump(isVulnerable($component['name'], $component['slug'], $component['version'], $component['type'], $vulnerabilities));
// Should return false.
$component['version'] = '5.9.2'
var_dump(isVulnerable($component['name'], $component['slug'], $component['version'], $component['type'], $vulnerabilities));
```
Running this script with the proper PSKey injected on line 147 should result in the following response:
```plaintext
bool(true)
bool(false)
bool(true)
bool(false)
bool(true)
bool(false)
bool(true)
bool(false)
```
# Threat Intelligence API
*The Threat Intelligence API has **custom pricing and is activated on request** — [contact us](https://patchstack.com/for-hosts/).*
> **Interactive reference:** Every endpoint, parameter, request body and response shape is documented in the [Threat Intelligence API reference](/api-reference/threat-intelligence-extended/).
>
> **Tooling (Postman, SDK, LLM):** spec URLs and import instructions live on [Overview → Using the API with your tools](/api-solutions/threat-intelligence-api/overview/#using-the-api-with-your-tools).
This page covers the concepts you need to use the API effectively — authentication, rate limiting, errors, and code samples. Use it alongside the interactive reference.
## Endpoints at a glance
[Section titled “Endpoints at a glance”](#endpoints-at-a-glance)
| Endpoint | Purpose |
| --------------------------------------------- | --------------------------------------------------------- |
| `GET /product/{type}/{name}/{version}` | Advisory list for a single product + version. |
| `GET /product/{type}/{name}/{version}/exists` | Boolean-only exists check (faster). |
| `GET /latest` | The 20 most recent vulnerabilities. |
| `POST /batch` | Bulk lookup — up to 50 products per request. |
| `GET /vulnerability/{id}` | Advisory detail (CVSS vector, OWASP, references, credit). |
Each per-item payload includes `description`, `vuln_type`, `cvss_score`, `cve`, `is_exploited`, `patch_priority`, `affected_in`, and `patched_in_ranges`. See [API properties](/api-solutions/threat-intelligence-api/api-properties/) for full field definitions.
## Base URL
[Section titled “Base URL”](#base-url)
```plaintext
https://patchstack.com/database/api/v2/
```
## Authentication
[Section titled “Authentication”](#authentication)
Every request must include your API key in the **`PSKey`** HTTP request header. Access is activated on request — [contact us](https://patchstack.com/for-hosts/) to request a key.
```plaintext
PSKey:
```
## Response format
[Section titled “Response format”](#response-format)
All responses are JSON. Responses are cached until the Patchstack database updates, at which point the cache is cleared. `GET /vulnerability/{id}` returns a richer, differently-shaped payload documented in the [reference](/api-reference/threat-intelligence-extended/).
## Batch lookups
[Section titled “Batch lookups”](#batch-lookups)
`POST /batch` accepts an array of up to 50 `{name, version, type, exists?}` items. The response is keyed by `product_slug`, not by array index — duplicate slugs in the request collapse. Per-item `exists: true` returns a boolean for that slug; `exists: false` (or omitted) returns the full advisory list.
## Rate limiting
[Section titled “Rate limiting”](#rate-limiting)
Custom, set per contract. Contact if you need a quota change.
## Errors
[Section titled “Errors”](#errors)
| Status | Meaning |
| -------------------------- | --------------------------------------------------------------- |
| `401 Unauthorized` | Missing or invalid `PSKey` header. |
| `403 Forbidden` | API key not authorised for the requested endpoint. |
| `404 Not Found` | Unknown product/version or vulnerability id. |
| `422 Unprocessable Entity` | Invalid request payload (e.g. batch with more than 50 items). |
| `429 Too Many Requests` | Rate limit exceeded. |
| `500` | Server error — please include the request id in any bug report. |
***
## Testing — curl one-liners
[Section titled “Testing — curl one-liners”](#testing--curl-one-liners)
```bash
# Latest 20 vulnerabilities
curl 'https://patchstack.com/database/api/v2/latest' \
-H 'PSKey: '
# Full advisory list for a plugin version
curl 'https://patchstack.com/database/api/v2/product/plugin/tutor/1.5.2' \
-H 'PSKey: '
# Boolean-only exists check
curl 'https://patchstack.com/database/api/v2/product/plugin/tutor/1.5.2/exists' \
-H 'PSKey: '
# Batch — boolean-only across two products
curl -X POST 'https://patchstack.com/database/api/v2/batch' \
-H 'PSKey: ' \
-H 'Content-Type: application/json' \
-d '[
{"name":"easy-digital-downloads1","version":"1.0.0","type":"plugin","exists":true},
{"name":"wordpress","version":"3.0.0","type":"wordpress","exists":true}
]'
# Advisory detail by id
curl 'https://patchstack.com/database/api/v2/vulnerability/4760' \
-H 'PSKey: '
```
## Batch walk (PHP)
[Section titled “Batch walk (PHP)”](#batch-walk-php)
```php
'easy-digital-downloads1', 'version' => '1.0.0', 'type' => 'plugin', 'exists' => false],
['name' => 'wordpress', 'version' => '3.0.0', 'type' => 'wordpress', 'exists' => true],
];
$ch = curl_init('https://patchstack.com/database/api/v2/batch');
curl_setopt_array($ch, [
CURLOPT_RETURNTRANSFER => true,
CURLOPT_POST => true,
CURLOPT_HTTPHEADER => ['PSKey: '.$apiKey, 'Content-Type: application/json'],
CURLOPT_POSTFIELDS => json_encode($components),
]);
$response = json_decode(curl_exec($ch), true);
curl_close($ch);
foreach ($response['vulnerabilities'] as $slug => $result) {
if (is_bool($result)) {
echo "{$slug}: ".($result ? 'vulnerable' : 'clear').PHP_EOL;
} else {
echo "{$slug}: ".count($result)." advisor".(count($result) === 1 ? 'y' : 'ies').PHP_EOL;
}
}
```
## More information
[Section titled “More information”](#more-information)
You can find more information about the Patchstack Threat Intelligence API on . If you have integration questions, email .
# NPM features
*The npm features extend the Threat Intelligence API with npm-ecosystem coverage. They run at a separate base URL, ship their own OpenAPI spec, and are available to **selected partners working directly with Patchstack**. The shared endpoints (`/latest`, `/product/{type}/{name}/{version}`, `/product/{type}/{name}/{version}/exists`, `/batch`) behave the same as the stable API but accept extra parameters and return a nested response shape. This page documents only what’s new — for the full spec including npm-flavour examples, see the [auto-generated reference](/api-reference/threat-intelligence-npm/). [Contact us](https://patchstack.com/for-hosts/) if you’d like access.*
Note
This partner API is not the only way to get npm vulnerability coverage. Developers can monitor their own JS/Node projects directly with [`@patchstack/connect`](/getting-started/installing-patchstack/installing-on-javascript-node-projects/), Patchstack’s official self-install npm connector — no partner agreement needed.
## Base URL
[Section titled “Base URL”](#base-url)
```plaintext
https://vdp-api.patchstack.com/database/api/npm/
```
Note
The previous base URL `https://vdp-api.patchstack.com/database/api/beta/` remains supported as a permanent legacy alias and returns identical responses, so existing integrations don’t need to change immediately.
## What’s new
[Section titled “What’s new”](#whats-new)
| Addition | Where it applies |
| --------------------------------------------------------------------------------------- | ---------------------------------------------------------------------------------------------------- |
| [`GET /all`](/api-reference/threat-intelligence-npm/operations/listallvulnerabilities/) | New endpoint — cursor-paginated full listing of every advisory, scoped by `?platform=`. |
| `?platform=npm` | List endpoints (`/all`, `/latest`, `/product/...`). Default is `wordpress`; case-insensitive. |
| `?cursor=` | `/all` and `/latest` — cursor pagination alongside the existing `?page=&per_page=`. |
| `?include=details` | List endpoints — adds an `advisory_details` markdown field to each item (npm). |
| Nested response shape | All list endpoints — `product`, `cvss`, `cwe`, `version_info` objects in place of the v2 flat shape. |
The full npm-features schema (every endpoint, parameter, response example) lives in the [auto-generated reference](/api-reference/threat-intelligence-npm/).
## Pagination
[Section titled “Pagination”](#pagination)
`/all` and `/latest` support **two independent strategies**. Use whichever fits your client:
* **Offset (`?page=&per_page=`)** — returns a `pagination` block with totals, `has_next_page`, `has_previous_page`, etc. Easy to jump to a specific page; slower at depth and susceptible to row-shift when new advisories land while you’re paging.
* **Cursor (`?cursor=`)** — returns a `cursor` block with `next_cursor`, `has_more`, `per_page`. Stable under concurrent inserts and faster at any depth. No `total` count (deliberately skipped to keep cursor mode fast).
`cursor` and `page` are mutually exclusive; passing both returns `422 Unprocessable Entity`. To bootstrap cursor mode, send `?cursor=` with an empty value.
When a cursor is malformed (invalid base64 or missing the `v1:` prefix), the endpoint returns `200` with an empty page:
```json
{
"vulnerabilities": [],
"cursor": { "next_cursor": null, "has_more": false, "per_page": 100 }
}
```
## Scoped npm packages
[Section titled “Scoped npm packages”](#scoped-npm-packages)
npm package slugs that include a `/` (e.g. `@scope/pkg`) conflict with the route separator. URL-encode the `/` as `%2F` or contact us for guidance on the encoding helper.
## Errors
[Section titled “Errors”](#errors)
In addition to the [stable error codes](/api-solutions/threat-intelligence-api/extended/#errors), the npm endpoints return:
| Status | Meaning |
| -------------------------- | ------------------------------------------------------------------------------------------------ |
| `422 Unprocessable Entity` | Invalid parameter combination (e.g. `cursor` + `page`), invalid `platform`, or `per_page > 500`. |
## Migration notes (stable v2 → npm endpoints)
[Section titled “Migration notes (stable v2 → npm endpoints)”](#migration-notes-stable-v2--npm-endpoints)
* npm responses use **nested objects** (`product`, `cvss`, `cwe`, `capec`, `version_info`) whereas the v2 shape is flat. Update parsers accordingly.
* `ghsa_id` was renamed to `ghsa` at the top level.
* `direct_url` was renamed to `url` (the npm-flavoured shape exposes a single URL only).
* The `description` field was dropped for npm (the title already includes it).
* The response body always contains a `vulnerabilities` array, plus either `pagination` (offset mode) or `cursor` (cursor mode).
## Multi-span advisories and the fix to show
[Section titled “Multi-span advisories and the fix to show”](#multi-span-advisories-and-the-fix-to-show)
Many npm advisories affect several majors at once. Product lookups (`GET /product/...` and `/batch`) now match the installed version against **every** affected span, not only the lowest one.
When a version matches, the advisory includes a `matched_range` object beside the existing top-level `fixed_in`:
| Field | Meaning |
| ---------------------------- | ------------------------------------------------------------------------------------------------------------------- |
| `matched_range.from_version` | Lower bound of the span that matched the installed version (nullable). |
| `matched_range.to_version` | Upper bound of that span (nullable). |
| `matched_range.to_bound` | How to read `to_version`: `exclusive`, `inclusive`, `last-affected`, or `null` when unrecorded. |
| `matched_range.fixed_in` | The fix for **this** span. Use this when telling a user what to upgrade to. `null` means that span was never fixed. |
Top-level `fixed_in` / `version_info.fixed` remain the **highest** fix across every span, for backwards compatibility. Prefer `matched_range.fixed_in` for user-facing upgrade advice so a site on `next@13` is not told to jump to a later major.
***
## Testing
[Section titled “Testing”](#testing)
### curl — one-liners
[Section titled “curl — one-liners”](#curl--one-liners)
```bash
# Latest 24h, npm
curl 'https://vdp-api.patchstack.com/database/api/npm/latest?platform=npm&per_page=10' \
-H 'PSKey: '
# Cursor pagination walk (bootstrap + follow)
curl 'https://vdp-api.patchstack.com/database/api/npm/all?platform=npm&per_page=50&cursor=' \
-H 'PSKey: '
# Check a specific npm package/version with full advisory text
curl 'https://vdp-api.patchstack.com/database/api/npm/product/npm/axios/0.21.4?include=details' \
-H 'PSKey: '
# Boolean-only exists check
curl 'https://vdp-api.patchstack.com/database/api/npm/product/npm/axios/0.21.4/exists' \
-H 'PSKey: '
```
### Cursor iteration (JavaScript / Node)
[Section titled “Cursor iteration (JavaScript / Node)”](#cursor-iteration-javascript--node)
```javascript
async function* allVulnerabilities(apiKey, platform = 'npm', perPage = 100) {
const base = 'https://vdp-api.patchstack.com/database/api/npm/all';
let cursor = ''; // empty = bootstrap cursor mode
while (true) {
const url = `${base}?platform=${platform}&per_page=${perPage}&cursor=${encodeURIComponent(cursor)}`;
const res = await fetch(url, { headers: { PSKey: apiKey } }).then(r => r.json());
for (const vuln of res.vulnerabilities) {
yield vuln;
}
if (!res.cursor.has_more) return;
cursor = res.cursor.next_cursor;
}
}
// usage
for await (const vuln of allVulnerabilities(process.env.PATCHSTACK_KEY)) {
console.log(vuln.id, vuln.title);
}
```
### Cursor iteration (PHP)
[Section titled “Cursor iteration (PHP)”](#cursor-iteration-php)
```php
true,
CURLOPT_HTTPHEADER => ['PSKey: '.$apiKey, 'Accept: application/json'],
]);
$response = json_decode(curl_exec($ch), true);
curl_close($ch);
foreach ($response['vulnerabilities'] as $vuln) {
// handle $vuln
}
$cursor = $response['cursor']['next_cursor'] ?? null;
} while ($response['cursor']['has_more'] ?? false);
```
## More information
[Section titled “More information”](#more-information)
You can find more information about the Patchstack Threat Intelligence API on . If you have integration questions, email .
# Overview
The Patchstack Threat Intelligence API exposes our vulnerability database for WordPress plugins, themes and core. It supports single-product lookups, bulk lookups (`POST /batch`, up to 50 products per request), the `/latest` rolling feed, advisory-by-id detail, and a per-item payload that includes `cvss_score`, `cve`, `is_exploited`, `patch_priority`, and `patched_in_ranges`.
Custom pricing, activated on request — [contact us](https://patchstack.com/for-hosts/).
* [Guide](/api-solutions/threat-intelligence-api/extended/) · [Reference](/api-reference/threat-intelligence-extended/) · [OpenAPI](/schemas/threat-intel-extended.yaml) · [Postman](/schemas/threat-intel-extended.postman_collection.json) · [API properties](/api-solutions/threat-intelligence-api/api-properties/)
## NPM features
[Section titled “NPM features”](#npm-features)
For partners covering JavaScript components, the npm features add **npm-ecosystem coverage** alongside WordPress, available to **selected partners working directly with Patchstack**. Beyond npm itself they ship the supporting additions that make npm coverage workable at scale: the new `GET /all` endpoint, cursor pagination, `?include=details` for full advisory bodies, and a nested response shape the stable API will eventually adopt. Everything else (`/latest`, `/product/{type}/{name}/{version}`, `/batch`) is the same surface as the stable API.
See the [NPM features](/api-solutions/threat-intelligence-api/npm-features/) page for the full delta — base URL, parameters, pagination, errors, and migration notes — and the [auto-generated reference](/api-reference/threat-intelligence-npm/) for the full schema. [Contact us](https://patchstack.com/for-hosts/) for access.
***
The legacy [Standard tier](/api-solutions/threat-intelligence-api/standard/) is no longer offered to new customers but remains documented for existing integrations — its endpoints are a strict subset of the current API.
***
## Using the API with your tools
[Section titled “Using the API with your tools”](#using-the-api-with-your-tools)
The API ships with an OpenAPI spec and a generated Postman collection. The npm features have their own spec — pick whichever you’re integrating against:
| | OpenAPI spec | Postman collection |
| ----------------------- | ------------------------------------------------------------------- | --------------------------------------------------------------------------------------------------------- |
| Threat Intelligence API | [`threat-intel-extended.yaml`](/schemas/threat-intel-extended.yaml) | [`threat-intel-extended.postman_collection.json`](/schemas/threat-intel-extended.postman_collection.json) |
| NPM features | [`threat-intel-npm.yaml`](/schemas/threat-intel-npm.yaml) | [`threat-intel-npm.postman_collection.json`](/schemas/threat-intel-npm.postman_collection.json) |
| Standard *(legacy)* | [`threat-intel-standard.yaml`](/schemas/threat-intel-standard.yaml) | [`threat-intel-standard.postman_collection.json`](/schemas/threat-intel-standard.postman_collection.json) |
### Postman, Insomnia, Bruno or Hoppscotch
[Section titled “Postman, Insomnia, Bruno or Hoppscotch”](#postman-insomnia-bruno-or-hoppscotch)
Every endpoint, parameter, request body and example is preconfigured. Download the Postman collection and drag it into your tool, or import by URL from inside the tool:
| Tool | How to import |
| -------------- | ---------------------------------------------------------------- |
| **Postman** | `File → Import → Link` and paste the collection URL. |
| **Insomnia** | `Create → Import From → URL` → paste the OpenAPI URL. |
| **Bruno** | `Collection → Import → OpenAPI V3 Spec` → paste the OpenAPI URL. |
| **Hoppscotch** | `Collections → Import/Export → OpenAPI` → paste the OpenAPI URL. |
**Authentication:** in Postman set the collection `Authorization` to **API Key**, key `PSKey`, value `{{PSKEY}}`, and add `PSKEY` as a collection variable with your real key as the **Current value** (leave Initial blank so it doesn’t sync to teammates). Other tools work the same way — set `PSKey` as a collection header once.
### Claude Code and other LLM coding assistants
[Section titled “Claude Code and other LLM coding assistants”](#claude-code-and-other-llm-coding-assistants)
Point your assistant at the spec. LLMs parse OpenAPI cleanly and will generate clients that match the real field names instead of hallucinating.
* **Ad hoc:** paste the spec URL into your prompt. Example: *“Write a Python client for `https://docs.patchstack.com/schemas/threat-intel-extended.yaml`. I need a batch walker over a `package.json`-style list.”*
* **In your repo:** download the spec to `docs/vendor/patchstack-threat-intel.yaml` and reference it from your `CLAUDE.md` / `AGENTS.md`. Your assistant can then grep the YAML for specific fields without refetching.
* **Plain-text fallback:** for tools that don’t parse YAML, our [`llms-full.txt`](/llms-full.txt) contains the full reference as flat markdown.
### SDK generation
[Section titled “SDK generation”](#sdk-generation)
Generate a client in any language from the spec:
```bash
# TypeScript
npx @openapitools/openapi-generator-cli generate \
-i https://docs.patchstack.com/schemas/threat-intel-extended.yaml \
-g typescript-fetch -o ./patchstack-client
# Python
npx @openapitools/openapi-generator-cli generate \
-i https://docs.patchstack.com/schemas/threat-intel-extended.yaml \
-g python -o ./patchstack-client-py
```
Speakeasy and Fern also consume the same spec and produce more idiomatic SDKs if you need a polished client library.
# Standard tier API
*The Standard Threat Intelligence API is **no longer offered to new customers**. New integrations should use the [Threat Intelligence API](/api-solutions/threat-intelligence-api/extended/), which is a strict superset — every endpoint and field documented here is available there. This page is preserved for existing Standard integrations.*
> **Interactive reference:** Every endpoint, parameter and response shape is documented in the [Threat Intelligence API (Standard) reference](/api-reference/threat-intelligence-standard/).
>
> **Tooling (Postman, SDK, LLM):** spec URLs and import instructions for all three tiers live on [Overview → Using the APIs with your tools](/api-solutions/threat-intelligence-api/overview/#using-the-apis-with-your-tools).
This page covers the concepts you need to use the API effectively — authentication, rate limiting, errors, and code samples. Use it alongside the interactive reference.
## Base URL
[Section titled “Base URL”](#base-url)
```plaintext
https://patchstack.com/database/api/v2/
```
## Authentication
[Section titled “Authentication”](#authentication)
Every request must include your API key in the **`PSKey`** HTTP request header. Standard keys remain valid for existing customers. New keys are not issued — [contact us](https://patchstack.com/for-hosts/) about Extended.
```plaintext
PSKey:
```
## Response format
[Section titled “Response format”](#response-format)
All responses are JSON. Responses are cached until the Patchstack database updates, at which point the cache is cleared.
The Standard tier returns a **flat** per-item shape. For the richer shape with `description`, `vuln_type`, `cvss_score`, `cve`, and `patched_in_ranges`, use the [Extended tier](/api-solutions/threat-intelligence-api/extended/). Field definitions live in [API properties](/api-solutions/threat-intelligence-api/api-properties/).
## Rate limiting
[Section titled “Rate limiting”](#rate-limiting)
Standard is limited to **5,000 requests per 24 hours**. Contact to move to Extended for a higher quota and additional endpoints.
## Errors
[Section titled “Errors”](#errors)
| Status | Meaning |
| ----------------------- | --------------------------------------------------------------- |
| `401 Unauthorized` | Missing or invalid `PSKey` header. |
| `403 Forbidden` | API key not authorised for the requested endpoint. |
| `404 Not Found` | Unknown product/version combination. |
| `429 Too Many Requests` | Rate limit exceeded. |
| `500` | Server error — please include the request id in any bug report. |
***
## Testing — curl one-liners
[Section titled “Testing — curl one-liners”](#testing--curl-one-liners)
```bash
# Full advisory list for a plugin version
curl 'https://patchstack.com/database/api/v2/product/plugin/tutor/1.5.2' \
-H 'PSKey: '
# Boolean-only exists check (faster)
curl 'https://patchstack.com/database/api/v2/product/plugin/tutor/1.5.2/exists' \
-H 'PSKey: '
# WordPress core
curl 'https://patchstack.com/database/api/v2/product/wordpress/wordpress/5.8.2' \
-H 'PSKey: '
```
## More information
[Section titled “More information”](#more-information)
You can find more information about the Patchstack Threat Intelligence API on . If you have integration questions, email .
# Frequently Asked Questions
* [Billing & Refunds](/faq-troubleshooting/billing-refunds)
* [Others](/faq-troubleshooting/other)
* [Account & Profile](/faq-troubleshooting/account-profile)
* [Pricing Plans](/faq-troubleshooting/pricing-plans)
* [Alerts & Notifications](/faq-troubleshooting/alerts-notifications)
* [Reports](/faq-troubleshooting/reports)
* [Technical](/faq-troubleshooting/technical)
* [Errors](/faq-troubleshooting/errors)
* [Firewall](/faq-troubleshooting/firewall)
* [Plugin](/faq-troubleshooting/plugin)
# Account & Profile - Frequently Asked Questions
* [2FA recovery](/faq-troubleshooting/account-profile/2fa-recovery)
# 2FA recovery
If you have lost the ability to log in with 2FA (two factor authentication), we can remove it from your Patchstack account manually.
To request removing the 2FA from your account:
1. Write an email stating that you wish to remove 2FA from your account. In the email, write down 3 domains that you protect with Patchstack, that are active on your account. In case you have less domains, write these all down.
2. Email must be sent from the same email address that your Patchstack account is registered with.
3. Send your email to .
4. For faster processing, you can also notify us about it via our [support chat](#).
# Alerts & Notifications - Frequently Asked Questions
* [How to send email notifications to all my team members?](/faq-troubleshooting/alerts-notifications/how-to-send-notifications-to-all-my-team-members)
# How to send email notifications to all my team members?
Currently, Patchstack sends notifications only to the user, who is the **owner** or **manager** of the site. But in case you would like to get notified to other email addresses, you can set up the custom alerts!
Note that custom alerts is a feature for Developer or Enterprise plan accounts only.
## Setting up an email alert
[Section titled “Setting up an email alert”](#setting-up-an-email-alert)
1. Navigate to the [**Alerts**](https://app.patchstack.com/alerts/latest) page from Patchstack App
2. On the top right corner, click on **+ Create Trigger** button
3. Give your trigger a title (e.g. Notification to Joe)
4. Choose the condition of when the alert is triggered. If you want to alert this email about found vulnerabilities, pick "Vulnerable" from the list
5. Choose **Email Notification** and enter the email
If you have multiple people you wish to send notifications to, you will need to repeat the process and add another email address.
[Click here to read more about creating custom alert triggers!](/patchstack-app/alerts/creating-a-trigger/)
# Billing & Refunds - Frequently Asked Questions
* [Do you offer refunds?](/faq-troubleshooting/billing-refunds/do-you-offer-refunds)
# Do you offer refunds?
Patchstack offers refunds within 30 days of the first payment.
To request a refund, please open the new chat in our support channel. After your refund request, we will check your account and let you know about the process of refunding.
# Errors - Frequently Asked Questions
* [Error: Blocked as suspected bot](/faq-troubleshooting/errors/error-blocked-as-suspected-bot)
* [Error: Cannot activate plugin because of: SSL routines:SSL23\_GET\_SERVER\_HELLO:sslv3 alert handshake failure](/faq-troubleshooting/errors/error-cannot-activate-plugin-because-of-ssl-routinesssl23_get_server_hellosslv3-alert-handshake-failure)
* [Error: "Cannot redeclare class Patchstack in…"](/faq-troubleshooting/errors/error-cannot-redeclare-class-patchstack-in)
* [Error code 22](/faq-troubleshooting/errors/error-code-22)
* [Error code 24](/faq-troubleshooting/errors/error-code-24)
* [Error code 5529](/faq-troubleshooting/errors/error-code-5529)
* [Error: "CSRF token missing or mismatch"](/faq-troubleshooting/errors/error-csrf-token-missing-or-mismatch)
* [Error: "Sorry, this file type is not permitted for security reasons"](/faq-troubleshooting/errors/error-sorry-this-file-type-is-not-permitted-for-security-reasons)
* [Error: The site \ cannot be added since it is invalid or blocks Patchstack from accessing the site.](/faq-troubleshooting/errors/error-the-site-url-cannot-be-added-since-it-is-invalid-or-blocks-patchstack-from-accessing-the-site)
* [Error: "The URL \ cannot be added since it returned a 5xx error code, this indicates an internal server error on your site. Please make sure it is accessible and not in maintenance mode."](/faq-troubleshooting/errors/error-the-url-url-cannot-be-added-since-it-returned-a-5xx-error-code-this-indicates-an-internal-server-error-on-your-site-please-make-sure-it-is-accessible-and-not-in-maintenance-mode)
* [Error: "The URL \ cannot be added since it timed-out or resulted in a server error. Is it currently online?"](/faq-troubleshooting/errors/error-the-url-url-cannot-be-added-since-it-timed-out-or-resulted-in-a-server-error-is-it-currently-online)
* [Error: "Warning: Cannot modify header information - headers already sent by"](/faq-troubleshooting/errors/error-warning-cannot-modify-header-information-headers-already-sent-by)
* [Error: You have entered an incorrect reCAPTCHA value on Login Page](/faq-troubleshooting/errors/error-you-have-entered-an-incorrect-recaptcha-value-on-login-page)
# Error: Blocked as suspected bot
This error might show up if visitors try to leave a comment on your site.
It is not caused by Patchstack but by a plugin called “MOJO Marketplace” or “Bluehost” as part of your Bluehost WordPress installation.
Either deactivate these plugins or reach out to your hosting company for more information as to why visitors are getting that error when they are trying to submit a comment.
# Error: Cannot activate plugin because of: SSL routines:SSL23_GET_SERVER_HELLO:sslv3 alert handshake failure
When you see this error when you attempt to activate Patchstack:
1. Check, if your server is using TLS 1.2 protocol activated. You can easily test it here: In case it is disabled, you should activate it in your hosting environment.
2. Ask your host to upgrade cURL/OpenSSL on your server to the latest version.
# Error: "Cannot redeclare class Patchstack in…"
There are many reasons why this can happen, usually, it’s because of an .htaccess issue or because the Patchstack plugin does not work properly with one of your other plugins.
First, please copy and paste the PHP error that you are facing and send it to us [through our chatbox](#) at the bottom right corner of the page. This will help us to resolve your issue.
Secondly, if you can still access your WordPress admin panel, go to **Plugins**, find **Patchstack Security** and click on **Deactivate**. After that, if your site still shows the fatal error, go back to **Plugins** and click **Delete** under **Patchstack Security**.
If you cannot access your WordPress admin area at all, we recommend deleting the plugin manually. For that, follow the instructions [here](/faq-troubleshooting/plugin/how-to-delete-the-patchstack-plugin-manually/).
# Error code 22
Error code 22 is the internal code we use for “temporary IP ban”. If you see this error even though you are a legitimate visitor, there can be multiple causes.
Please check the following steps:
1. The real visitor's IP address is not properly forwarded to your application, either due to a proxy server or another plugin that overrides it. This causes the IP address of the server or proxy to be logged for all visitors which can block all traffic.\
We have a setting to override the IP header we use to retrieve the IP address. To find it, go to **Patchstack App** > **yoursite.com** > **Protection** > **Additional settings** > Scroll down to **IP address header override** setting. For example, if your host tells you it's in $\_SERVER\['IP-Header-X'] then you enter IP-Header-X in the text field.
2. You have a plugin installed which sends a suspicious payload behind the scenes which ultimately triggers our temporary IP ban feature.
3. The error page is cached by a caching plugin. We send error code 403 when this error is shown so this should never really happen unless the cache server is configured incorrectly.
4. Make sure that you have whitelisted the proper user roles for your site. Check the user roles whitelist settings, by navigating to **Patchstack App** > **yoursite.com** > **Protection** > **Additional settings**.
The temporary IP ban usually lifts within 30 minutes. You can [start a chat with us](#), make sure to provide the URL of your site so we can investigate the exact cause and fix it permanently.
# Error code 24
Error code 24 means that there has been too many failed log in attempts. Therefore the IP got temporarily blocked by Patchstack.
You can adjust the threshold for failed log in attempts from Patchstack App, by navigating to **Sites** > **yoursite.com** > **Hardening** > **Login protection**
By scrolling down, you can see the **Block IP addresses on login** section, where you can tweak the settings.
* Enable/disable automatic brute-force IP ban
* Block IP for X minutes; after Y failed login attempts; over a period of Z minutes (where you can define X, Y and Z)
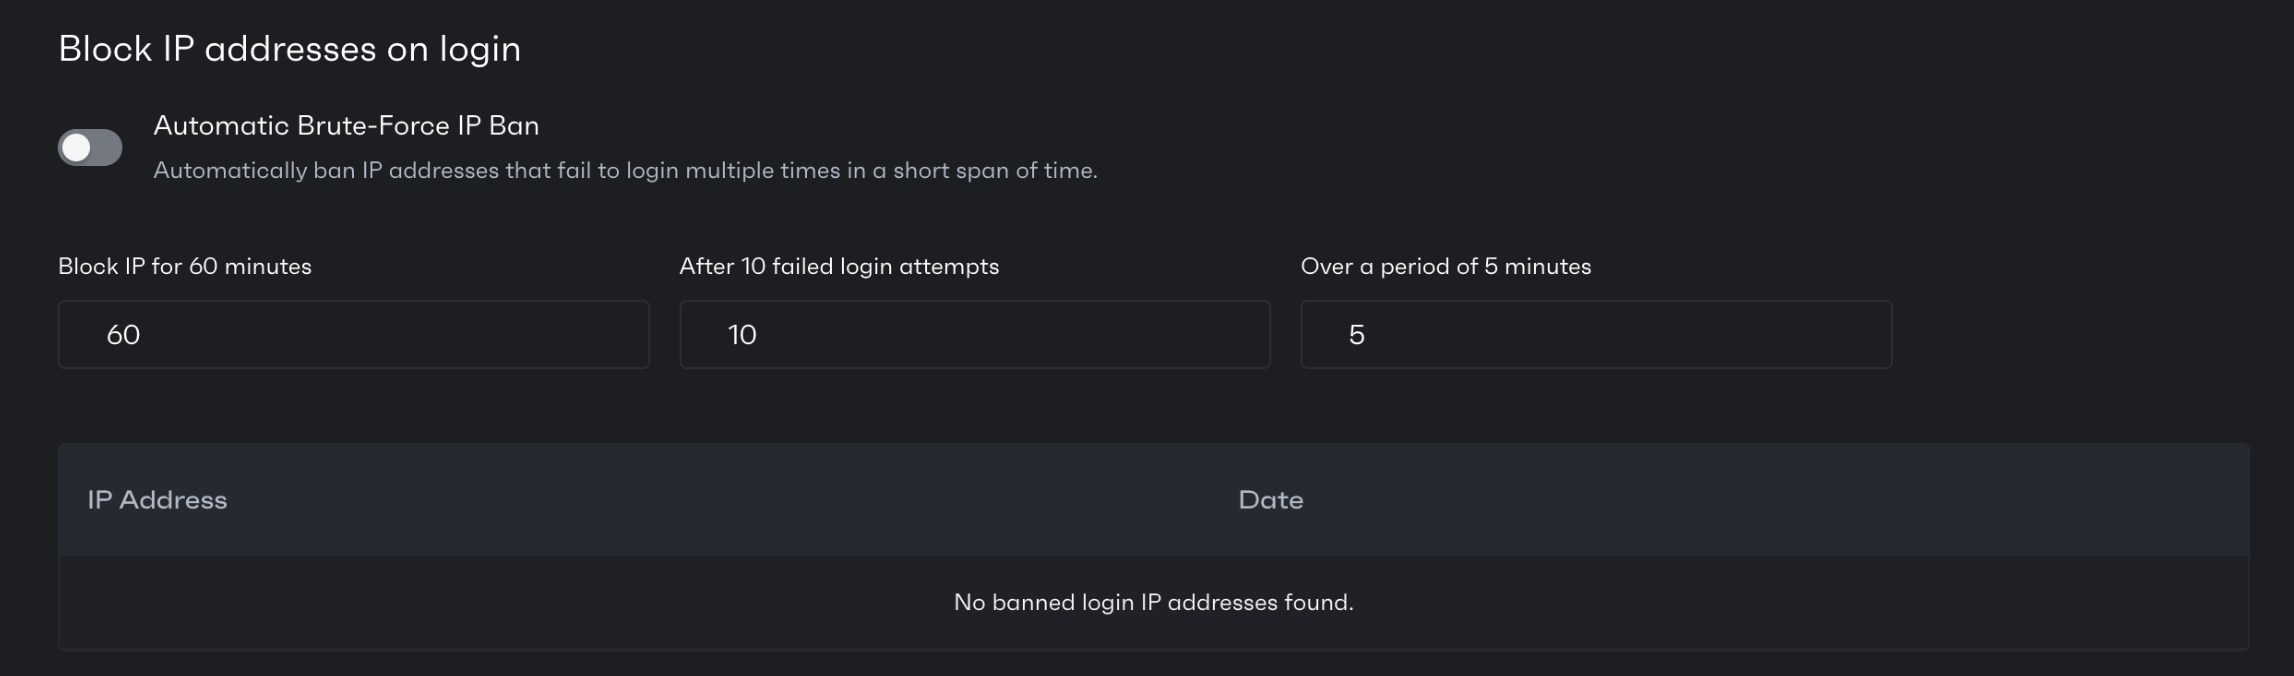
If you need any help, you can [start a chat with us](#), make sure to provide the URL of your site so we can investigate the exact cause and fix it permanently.
# Error code 5529
This error usually means that the visitor got blocked because of a malicious request received by your server.\
If you are sure, it was a false positive blocking, you may whitelist the payload that got blocked.
We recommend you to check the firewall logs on your site. To open the firewall log:
1. Go to **Patchstack App** > **Sites** > **yourdomain.com**
2. Open the **Protection** tab
3. Scroll to the bottom of this page, to find the **Activity** section
4. Open the log entry which has the IP of the person who got blocked
5. Copy the part of the payload that should be whitelisted
Example payload looks like this: `[action] => edit_post`
To whitelist a payload:
1. Navigate to **Patchstack App** > **Sites** > **yoursite.com** > **Protection** > **Additional Settings**.
2. Into the Whitelist textbox, type “PAYLOAD:\[action] => edit\_post”
3. Click **Save settings**
If done correctly, the visitor should not get blocked with such request anymore.
If you have any questions regarding this error, feel free to [chat with our live support](#) here.
# Error: "CSRF token missing or mismatch"
This error might show up on the Patchstack App when you perform certain actions.
Please follow these steps:
1. Refresh the app/page by clicking the refresh button or by pressing F5.
2. Logout from the Patchstack App.
3. Login back into the Patchstack App.
This should resolve the issue. If it does not, please reach out to us so we can further investigate what is going wrong.
# Error: "Sorry, this file type is not permitted for security reasons"
This can happen when you try to upload a file to your site.\
The Patchstack plugin has no feature in place to prevent you from uploading files through the media / file manager, so this caused by a different plugin or by the default WordPress settings.
Take a look at [this article](https://www.elegantthemes.com/blog/wordpress/how-to-fix-the-sorry-this-file-type-is-not-permitted-for-security-reasons-error-in-wordpress) to fix the issue.
# Error: The site cannot be added since it is invalid or blocks Patchstack from accessing the site.
This error often appears when there is no public access to your website. There are 3 main reasons this is happening:
1. Usually, it means that your server is protected using .htaccess and .htpasswd. To install the Patchstack plugin and connect Patchstack App to your website, it has to be publicly accessible for Patchstack as well, so you will have to remove the server authentication.
2. In order for us to properly start monitoring your application, its response when you first add it must not be a 5xx HTTP status code.
3. When your site is in maintenance mode, it will also result in a 5xx HTTP status code and thus will trigger this error.
# Error: "The URL cannot be added since it returned a 5xx error code, this indicates an internal server error on your site. Please make sure it is accessible and not in maintenance mode."
In order for us to properly start monitoring your application, its response when you first add it must not be a 5xx HTTP status code.
When you put your site in maintenance mode, it will also result in a 5xx HTTP status code and thus will trigger this error.
# Error: "The URL cannot be added since it timed-out or resulted in a server error. Is it currently online?"
This error can be shown because of multiple reasons:
* The site is currently offline.
* The site takes too long to load and times out.
Patchstack is blocked from accessing your site because of an IP block from your host, or because you have strict protection in place from a service such as Cloudflare, Incapsula, or Sucuri.
# Error: "Warning: Cannot modify header information - headers already sent by"
There are 2 possible reasons this can happen:
1. Check the very first error that shows up on the screen. If this error occurs in a file that is unrelated to Patchstack then the initial cause of this error is not caused by the Patchstack plugin. Try turning off your plugins one-by-one until the error disappears.
2. If the very first error that shows up on the screen is in a file of the Patchstack plugin, then please copy the error, [start a new chat](#), and paste the error with your site URL. That way we can figure out the cause and fix the error in a future plugin version.
# Error: You have entered an incorrect reCAPTCHA value on Login Page
**Solution 1:** The easiest solution is to clear the cache, try to login from a different browser or incognito/private browser mode.
**Solution 2:** If the first solution doesn’t work, it is necessary to deactivate the plugin manually. Please complete the following steps:
1. Go to the /wp-content/plugins folder via FTP ([see different FTP clients here](https://developer.wordpress.org/advanced-administration/upgrade/ftp/));
2. Find and rename “patchstack” folder into something else, like “deactivate\_patchstack”;
3. After you log into your dashboard, you can rename the folder back from "deactivate\_patchstack" to "patchstack";
4. Disable reCAPTCHA from the settings in Patchstack App, by navigating to\
**Patchstack App** > **Sites** > **yoursite.com** > **Hardening** > **Captcha**
# Firewall - Frequently Asked Questions
* [App is showing the firewall of my site as delayed](/faq-troubleshooting/firewall/app-is-showing-the-firewall-of-my-site-as-delayed)
* [How do I block an IP address from accessing my site?](/faq-troubleshooting/firewall/how-do-i-block-an-ip-address-from-accessing-my-site)
* [I activated the plugin, but still get the message: "Install the plugin to activate the firewall"](/faq-troubleshooting/firewall/i-activated-the-plugin-but-still-get-the-message-install-the-plugin-to-activate-the-firewall)
* [Legitimate visitors or pages are being blocked by the firewall. How do I add these to the whitelist?](/faq-troubleshooting/firewall/legitimate-visitors-or-pages-are-being-blocked-by-the-firewall-how-do-i-add-this-to-the-whitelist)
* [What is the difference between a WAF and vPatching?](/faq-troubleshooting/firewall/what-is-the-difference-between-a-waf-and-virtual-patching)
# App is showing the firewall of my site as delayed
This firewall error might show up on the Patchstack App.
On the Patchstack App, you might see that the firewall is indicating as being “delayed”.\
This can happen due to a few reasons:
1. Scheduled tasks are not running properly on your web application. We attempt to ping our API from your site every three hours. However, since WordPress scheduled tasks run when you have visitors on your site, this might not happen if you have no visitors on your site. It is also possible that scheduled tasks are not running at all on your site even when you have visitors due to an error. You can use a plugin such as [WP Crontrol](https://wordpress.org/plugins/wp-crontrol/) to keep track of your scheduled tasks.
2. You do not have the right API key configured on the license settings page. The API credentials which you can find on the Patchstack App under **Sites** > **yourdomain.com** > **Settings**. API Keys should match the API credentials on your WordPress site at **/wp-admin** > **Settings** > **Security**.
One potential solution to reason 1 is to use a server-based scheduled task that triggers your scheduled tasks even when you have no visitors.
1. Disable the default WordPress cronjob by adding the following to your wp-config.php file in the root folder of your site:
```php
define('DISABLE_WP_CRON', true);
```
2. Set up a cronjob in your hosting account management panel. In cPanel, this can be found under Advanced > Cron Jobs.
3. Set the interval to something between 5 and 15 minutes.
4. Set the cron command to the following (change the URL to your own):
```bash
wget -q -O - https://yoursite.com/wp-cron.php?doing_wp_cron >/dev/null 2>&1
```
5. Now click on the **Create new cron job** button.
# How do I block an IP address from accessing my site?
With Patchstack, it is easy to block certain IP addresses from accessing your site.
In order to block an IP address, do the following:
1. Log in to the Patchstack App
2. Go to **Sites** > **yourdomain.com** > **Protection** > **Additional settings**
3. Scroll down to **IP Block List**
4. Enter each IP addresses to a new line
5. The following formats are accepted:
* 127.0.0.1
* 127.0.0.\*
* 127.0.0.0/24
* 127.0.0.0-127.0.0.255
# I activated the plugin, but still get the message: "Install the plugin to activate the firewall"
There is an easy way to fix this issue.
Usually, this is because for some reason we were unable to contact our server to process the activation.
In order to solve this, deactivating and then activating the plugin from the plugin list in the WordPress admin area should fix the issue.
If this still does not work, your host is probably blocking outgoing connections to our server, [](https://api.patchstack.com)
Feel free to [contact our support chat](#) with this issue.
# Legitimate visitors or pages are being blocked by the firewall. How do I add these to the whitelist?
Our whitelist feature makes it easy to whitelist specific requests.
To manage the whitelist:
1. Log in to the Patchstack App
2. Go to **Sites** > **yourdomain.com** > **Protection** > **Additional settings**
3. Scroll down to **Whitelist** text field
This text field supports a specific syntax that you can use to whitelist specific requests. Each definition must be placed on its own line.
We accept the following parameters in this text field:
**Parameters**\
IP:IPADDRESS\
PAYLOAD:someval\
URL:/someurl
**Definitions**\
IP = firewall will not run against the IP\
PAYLOAD = if the entire payload contains the keyword, the firewall will not proceed\
URL = if the URL contains the given URL, the firewall will not proceed
**Example**\
IP:192.168.1.1\
PAYLOAD:contact\_form\
URL:water\
URL:/some-form
In this scenario, the firewall will not run if the IP address is 192.168.1.1 or if the payload contains contact\_form or if the URL contains water, or if the URL contains /some-form.
# What is the difference between a WAF and vPatching?
**WAF** stands for Web Application Firewall, which is a firewall that inspects web traffic and blocks malicious requests. WAFs typically run on the web server software itself and have limited knowledge of the web applications they are protecting. WAFs tend to include and run all firewall rules against all requests, even if it does not apply to the underlying software.
**vPatching** is similar to WAF: blocking known malicious requests but running within the application itself. Patchstack’s vPatching goes a step further and can take into context information that only the application (such as WordPress) itself is aware of, like user authorization, software versions, etc. Patchstack has built the vPatch system, a specific method that provides auto-mitigation to open-source software security vulnerabilities through crowdsourced security research and AI/ML based source code analysis.
This means that vPatches tend to be more efficient and cause less resource usage in the application compared to a WAF because the only rules that are enabled are the ones applicable to each website.
[Read more about vPatching here](https://patchstack.com/articles/virtual-patching/)
# Other - Frequently Asked Questions
* [Can I have other security plugins activated and running next to Patchstack?](/faq-troubleshooting/other/can-i-have-other-security-plugins-activated-and-running-next-to-patchstack)
* [Dashboard shows no attacks blocked](/faq-troubleshooting/other/dashboard-shows-no-attacks-blocked)
* [Data Processing Agreement (DPA) and GDPR](/faq-troubleshooting/other/data-processing-agreement-dpa-and-gdpr)
* [Does Patchstack have a malware scanner?](/faq-troubleshooting/other/does-patchstack-have-a-malware-scanner)
* [Does Patchstack work with LiteSpeed?](/faq-troubleshooting/other/does-patchstack-work-with-litespeed)
* [Does Patchstack work with MarketPlan.io?](/faq-troubleshooting/other/does-patchstack-work-with-marketplanio)
* [How do I add an intranet site to the Patchstack App?](/faq-troubleshooting/other/how-do-i-add-an-intranet-site-to-the-portal)
* [How do I connect Patchstack with multisite environment?](/faq-troubleshooting/other/how-do-i-connect-patchstack-with-multisite-environment)
* [How do I turn on the XML-RPC feature?](/faq-troubleshooting/other/how-do-i-turn-on-the-xml-rpc-feature)
* [How does multisite work and what is the pricing model?](/faq-troubleshooting/other/how-does-multisite-work-and-what-is-the-pricing-model)
* [How does the Patchstack firewall compare to Sucuri or Wordfence?](/faq-troubleshooting/other/how-does-the-patchstack-firewall-compare-to-sucuri-or-wordfence)
* [How to write a review for Patchstack?](/faq-troubleshooting/other/how-to-write-a-review-for-patchstack)
* [I installed the plugin on my site but it still shows I have missing headers on the App. Why is that?](/faq-troubleshooting/other/i-installed-the-plugin-on-my-site-but-it-still-shows-i-have-missing-headers-on-the-portal-why-is-that)
* [List of vulnerability icons with descriptions](/faq-troubleshooting/other/list-of-vulnerability-icons)
* [Missing security headers Permission-Policy or Content-Security-Policy (CSP)](/faq-troubleshooting/other/missing-security-headers-permission-policy-or-content-security-policy-csp)
* [Patchstack shows the plugin is "Up to date" but actually is not](/faq-troubleshooting/other/patchstack-shows-the-plugin-is-up-to-date-but-actually-is-not)
* [Theme editor missing](/faq-troubleshooting/other/theme-editor-missing)
* [What is the best way to resell Patchstack to my customers?](/faq-troubleshooting/other/what-is-the-best-way-to-resell-patchstack-to-my-customers)
* [What is the CVSS score?](/faq-troubleshooting/other/what-is-the-cvss-score)
# Can I have other security plugins activated and running next to Patchstack?
It is possible to run other security plugins next to Patchstack to extend the security features present on your site.
Do note that we cannot guarantee that your site will function properly and smoothly with multiple security plugins installed and activated. Definitely do not enable 2 of the same features, such as login 2FA or login page rename on 2 or more security plugins.
Finally, one thing to keep in mind is that the performance of your site will go down with multiple security plugins installed.
# Dashboard shows no attacks blocked
If you have a lot of sites, it can be a heavy operation to gather information on how many attacks were blocked and which application had the most attacks blocked. In order to reduce server load we cache the data on the dashboard for 60 minutes.
The data you see when you click on your site in the dashboard is never cached, that’s all real-time.
# Data Processing Agreement (DPA) and GDPR
**DEFINITIONS**
Site – website available at patchstack.com\
Services – the services available from and related to the domain and subdomains of the Site\
Patchstack (also referred to as “we”, “our” or “us”) – Patchstack OÜ, a company incorporated and registered under the laws of the Republic of Estonia with registration code 14331217\
User (also referred to as “you” or “your”) – an individual who creates a user account\
General Terms – [terms and conditions of services.](https://patchstack.com/terms-and-conditions/)
We provide services for B2B clients and therefore, privacy regulations (GDPR - General Data Protection Regulation) do not apply for such data, however, we might provide services also for individuals and therefore, we are informing you about personal data processes herein.
Our [Privacy Notice](https://patchstack.com/privacy-policy/) describes how we collect, use, process, and disclose your information related to your access to using the Patchstack services.
Our Services include a website security firewall to prevent cyber attacks and to protect your websites. Using Patchstack or any other Services, we do not collect any personal data about users of your website or website owners. In the event, we detect website hacking incidents we are not allocating any personal data because hackers are hiding identity and do not reveal identifiable IP addresses, names, e-mail addresses, or any personal data. Therefore, we are in a position where we are not processing any personal data of the hackers as well.
Therefore as we are not collecting personal data, there is no need to sign a data processing agreement between you and Patchstack.
# Does Patchstack have a malware scanner?
Rather than wait for your software to become infected we focus on preemptive measures. This allows Patchstack to be up to 10x lighter than competing (often bloated) malware scanners and still provide effective security. Plugin-level malware scanners can easily be whitelisted by malware itself, therefore scanning with plugin-level scanner could leave a false impression of site being clean.
We recommend scanning your site with network-level tools like Imunify360 or ClamAV.
[There’s an article of one case-study here](https://snicco.io/blog/wordpress-malware-scanner)
# Does Patchstack work with LiteSpeed?
LiteSpeed has the ability to support .htaccess files as well, so Patchstack will work with LiteSpeed.\
However, make sure your .htaccess file contains the following on top of the file:
```plaintext
CacheLookup public on
```
# Does Patchstack work with MarketPlan.io?
By default, the Patchstack plugin injects certain security headers into the server response of your application. However, these security headers prevent Marketplan.io from working properly on your application.
This most likely happens because they insert your site as an iframe into their application which the X-Frame-Options security header prevents from doing because it prevents clickjacking attacks.
In order to make it work, disable the security headers setting by going to the **Patchstack App** > **Sites** > **yourdomain.com** > **Hardening** > **.htaccess** > Uncheck **Add security headers** > Scroll down and click on the **Save settings** button.
It might take a few minutes before the security headers have been removed from your site.
# How do I add an intranet site to the Patchstack App?
In order to add an intranet site to the Patchstack App, you have to do a few different steps until we properly support it.
We are still working on supporting intranet sites properly:
Because the site is not accessible from the public, you first have to add a random domain name to your account that exists on the public internet. After that, go to **Sites** > **yourdomain.com** > **Settings**. Change the URL to the URL of your intranet site.
After that, refresh the page and install the Patchstack plugin [manually](/getting-started/installing-patchstack/installing-via-wordpress-repository/).
# How do I connect Patchstack with multisite environment?
To connect Patchstack with multisite environment, check the article here:
# How do I turn on the XML-RPC feature?
XML-RPC should no longer be used, but your site might still make use of it.\
As of April 10th 2019, we added a new option that blocks access to XML-RPC by default.
In order to turn it back on:
1. Go to **Patchstack App** > **Sites** > **yourdomain.com** > **Hardening**
2. Scroll down a bit and uncheck the **Restrict XML-RPC access to authenticated users only**
3. Click **Save settings**
# How does multisite work and what is the pricing model?
Once you install the plugin on a multisite network, you will see a page where you can activate Patchstack on the sites that are available on the multisite installation.
Each site will be added to the Patchstack App individually and will take up a slot on your account.
# How does the Patchstack firewall compare to Sucuri or Wordfence?
You can see the comparison with Sucuri here: [](https://patchstack.com/sucuri-alternative/)\
You can see the comparison with Wordfence here: [](https://patchstack.com/wordfence-alternative/)
# How to write a review for Patchstack?
Reviews are a good source for people who are considering trying out Patchstack. When you write a review, try to explain your experience, the features you like the most, and how they helped you.
This will help us and we really appreciate your help in showing the value we create.
**We collect reviews on two different platforms:**
**WordPress.org:** [](https://wordpress.org/support/plugin/patchstack/reviews/)
**G2:** [](https://www.g2.com/products/patchstack/reviews)
When writing a review, remember that you’re reviewing a service that our team poured our heart and soul into to create.
When you have problems with the service, it’s always good to **[open up a support chat](#) to find help from our team first.** Our minimum response time is between a few minutes to a few hours.
# I installed the plugin on my site but it still shows I have missing headers on the App. Why is that?
Certain things are not updated instantly in the Patchstack App, here’s why.
By default, we perform an extended monitoring scan of your site 2 times a day. However, we currently do not perform a new scan yet when the WordPress plugin has been installed on your site.
It is also possible that the .htaccess file on your webserver does not have the proper CHMOD permissions setup so we can write to it. We need to be able to write to the .htaccess file in order to inject the security headers to the response.
After plugin installation, you can also manually check your security headers by using a tool such as .
# List of vulnerability icons with descriptions
There are several icons shown about Patchstack vulnerability entries. Below is a list of what each icon means.

**No update available**\
This software is found vulnerable, but it has no updates yet. It is recommended to turn on Patchstack firewall, or to disable and remove this plugin until update is available.
***

**Update available**\
This plugin has an update available. It is recommended to do this immediately as new software versions usually come with patched code (in case it is found vulnerable).
***

**High patch priority**\
Red exclamation mark indicates that this software version is expected to be mass-exploited or has already known to be exploited vulnerability. It is recommended to turn on Patchstack firewall as high patch priority vulnerabilities receive a vPatch from Patchstack. Update this software as soon as possible.
***

**Medium patch priority**\
Yellow exclamation mark indicates that this software version is not expected to become mass-exploited, but could potentially be exploited in more targeted attacks. It is recommended to turn on Patchstack firewall as medium patch priority vulnerabilities receive a vPatch from Patchstack. Update this software as soon as possible.
***

**Low patch priority**\
Gray exclamation mark indicates that this software version is not expected to become exploited. It is important to update this software when possible, although the security risk is very low. Low patch priority vulnerabilities won’t receive a vPatch from Patchstack.
***

**CVSS score**\
These numbers represent the CVSS score given to the vulnerability. The higher the CVSS score, the more severe is the vulnerability.\
Low (0.0 - 3.9); Medium (4.0 - 6.9); High (7.0 - 8.9); Critical (9.0+)
# Missing security headers Permission-Policy or Content-Security-Policy (CSP)
The reason Patchstack does not add these security headers to your site that both of these headers requires very specific manual configuration for them to operate properly.
**Permission-Policy**\
The permission-policy header defines what API features can be used (such as geolocation, microphone, fullscreen, autoplay, payments) on a website, but Patchstack cannot possibly know what your site is about and what API features it uses. Therefore, it requires manual configuration. You can generate the policy for this HTTP security header here
**Content-Security-Policy (CSP)**\
The content-security-policy header defines how and what resources can load on your website through any kind of HTML tag. The only way to properly generate this policy is the understand every single resource that is loaded on your site through all HTML tags, including images, scripts (such as Google Analytics), iframes, XHR requests, stylesheets, fonts, objects, videos, forms, and many other HTML tags. Patchstack cannot possibly know all resources that your site calls either locally or from a third-party on all pages that are available on your site. More information can be found here
# Patchstack shows the plugin is "Up to date" but actually is not
This can happen due to two reasons:
* This is a premium or pro plugin and uses its own update servers
* Your site is out of sync with the Patchstack App
The information we show about the plugin status in Patchstack App, is synced straight from your WordPress site.
### 1. This is a premium / pro-licensed plugin
[Section titled “1. This is a premium / pro-licensed plugin”](#1-this-is-a-premium--pro-licensed-plugin)
If the plugin shows that it is up-to-date in the Patchstack App, but in reality it is not, then it means that this plugin does not utilize the regular WordPress.org update server but the plugin has its own update server connection integrated. The integration varies and in some cases it does not store the new version in the database, but rather shows it real-time only when you visit the backend of your WordPress site.
### 2. Your site is out of sync with Patchstack App
[Section titled “2. Your site is out of sync with Patchstack App”](#2-your-site-is-out-of-sync-with-patchstack-app)
A missing or wrong version may also show up if your WordPress site is out of sync with the Patchstack App.
* Make sure your site is publicly accessible (so Patchstack can access it)
* Check if you have the correct Patchstack API key inserted into the Patchstack plugin. Navigate to **wp-admin** > **Settings** > **Security**.
* Make sure that you don’t use the same API key across multiple sites
* Make sure that the site URL you have entered on Patchstack App is correct
# Theme editor missing
This security measure is turned on by default in the plugin.\
In order to make this option appear again while having the Patchstack plugin activated, do the following:
1. Go to the **Patchstack App** > **Sites** > **yourdomain.com** > **Hardening**
2. From the submenu choose again **Hardening**
3. Uncheck the **Disable theme editor to protect from potential automated attacks**
4. Scroll down and click **Save settings**
# What is the best way to resell Patchstack to my customers?
Include it in your website price or maintenance fee. Your service will be more professional and usually clients recommend your service to more people when you show that you take the extra mile and care about security and take responsibility.
Patchstack will help you to automate protection, monitor the security, and even lets you know with alerts when maintenance is needed.
[Check out this page](https://patchstack.com/for-agencies/) OR [read an article about how to sell care plans with Patchstack](https://patchstack.com/articles/how-i-started-selling-wordpress-care-plans-to-my-clients/)
# What is the CVSS score?
CVSS or Common Vulnerability Scoring System is a great way to measure and clearly define the danger level of vulnerability.
In other words, we can calculate the impact which can happen by exploiting a particular vulnerability. The latest CVSS version is 3.1, and we’re using this as a standard in our database.
Patchstack calculates only CVSS Base Score. CVSS offers additional scoring schemes like Temporal Score and Environmental Score.
CVSS Base score calculator uses eight parameters to calculate a particular vulnerability’s severity (Attack Vector, Attack Complexity, Privileges Required, User Interaction, Scope, Confidentiality, Integrity, Availability).
It’s easy to understand the simple logic behind this scheme. For example, we have the parameter “Attack Complexity,” there are two possible types of this parameter Low and High.
If an attack has a high complexity, it will add fewer score points because not everyone can execute this type of attack. If an attack is easy to perform (Attack Complexity Low), it adds more score points for vulnerability.
Besides the parameters that give us a clue about the attack complexity, we have three parameters that say what could be impacted (Confidentiality, Integrity, Availability).
It is the so-called CIA Triad (you can read about the CIA Triad here - [](https://en.wikipedia.org/wiki/Information_security))
By adding all these parameters to the CVSS calculator (you can try it yourself here [](https://www.first.org/cvss/calculator/3.1)) we get the base score represented by numbers from 0.0 (zero - no threat) to 10.0 (ten - critical threat), so the bigger number means the bigger problem.
As you can see, CVSS is a very convenient and straightforward way to show the level of danger (similar to the earthquake scale).
# Plugin - Frequently Asked Questions
* [Can I install the same plugin file on all of my sites?](/faq-troubleshooting/plugin/can-i-install-the-same-plugin-file-on-all-of-my-sites)
* [Does the Patchstack plugin work on the server level or on an application level?](/faq-troubleshooting/plugin/does-the-patchstack-plugin-work-on-the-server-level-or-on-an-application-level)
* [How often does Patchstack sync with my site?](/faq-troubleshooting/plugin/how-often-does-patchstack-sync-data)
* [How to delete the Patchstack plugin manually?](/faq-troubleshooting/plugin/how-to-delete-the-patchstack-plugin-manually)
* [How to install or reinstall the plugin?](/faq-troubleshooting/plugin/how-to-install-or-reinstall-the-plugin)
* [Updating Patchstack from <= 2.0.20](/faq-troubleshooting/plugin/updating-patchstack-from-2020)
* [Where do I find the API key to connect the Patchstack plugin?](/faq-troubleshooting/plugin/where-do-i-find-the-api-key)
* [Where is the Patchstack settings page on the plugin?](/faq-troubleshooting/plugin/where-is-the-patchstack-settings-page-on-the-plugin)
* [Why is my site not working after updating the plugin?](/faq-troubleshooting/plugin/why-is-my-site-not-working-after-updating-the-plugin)
# Can I install the same plugin file on all of my sites?
Unfortunately, it is not possible at this time.
Each plugin .zip file you download has its own key that is used to connect your site to the Patchstack App. If you upload the same .zip file to multiple websites, the logged data gets corrupted.
# Does the Patchstack plugin work on the server level or on an application level?
The Patchstack firewall runs on the application layer, the same layer where your website is running. This means you do not need SSH access or root access to install a custom package onto your server.
You install it like any other plugin on WordPress.
# How often does Patchstack sync with my site?
Patchstack syncs with your site on different intervals for different purposes. Here’s a list of how often and for what we sync.
**Logs** are synced every 15 minutes (activity and protection logs)
**Firewall rules** (vPatching and Community IP blocklist) are synced every hour
**Software data** is synced twice a day at random times. Also the software data is synced every time when you update, activate, deactivate, delete any plugin/theme in your WordPress admin
**Ping** - your site is pinged by Patchstack every 3 hours to check if it is still properly connected to the Patchstack App
**Status of subscription** is automatically synced twice a day, to check if your license is still valid.
# How to delete the Patchstack plugin manually?
In order to manually remove the Patchstack plugin from your WordPress site, please login into the FTP of your server first, or if you have access to something such as CPanel/WHM you can find the file manager feature.
Once logged in, head to the following location **/wp-content/plugins/** and delete the folder **patchstack**.
When this is done, Patchstack will be removed from your WordPress site.
# How to install or reinstall the plugin?
## Method 1: Upload Patchstack plugin to your WordPress site
[Section titled “Method 1: Upload Patchstack plugin to your WordPress site”](#method-1-upload-patchstack-plugin-to-your-wordpress-site)
You can get the .zip file and upload the plugin to your WordPress site with the **API Key** already inserted.\
For that:
1. Go to the Patchstack App. Then navigate to **Sites** > **yourdomain.com** > **Settings**
2. Click **Download latest version**
3. Go to your WordPress admin page, click on **Plugins** > **Add New** > **Upload Plugin**
4. Upload the .zip file
Please note that you can use the same .zip file **ONLY ON** that one domain since the API key must be unique for each site added to the Patchstack App.
## Method 2: Install plugin from WordPress repository
[Section titled “Method 2: Install plugin from WordPress repository”](#method-2-install-plugin-from-wordpress-repository)
Another way to install the Patchstack plugin is from WordPress itself. In your WordPress admin area, navigate to **Plugins** > **Add New** > Type “Patchstack” to search.
1. Install and activate the plugin
2. Go to Patchstack App and navigate to **Sites** > **yourdomain.com**
3. Click on the **Settings** from the submenu (image below)
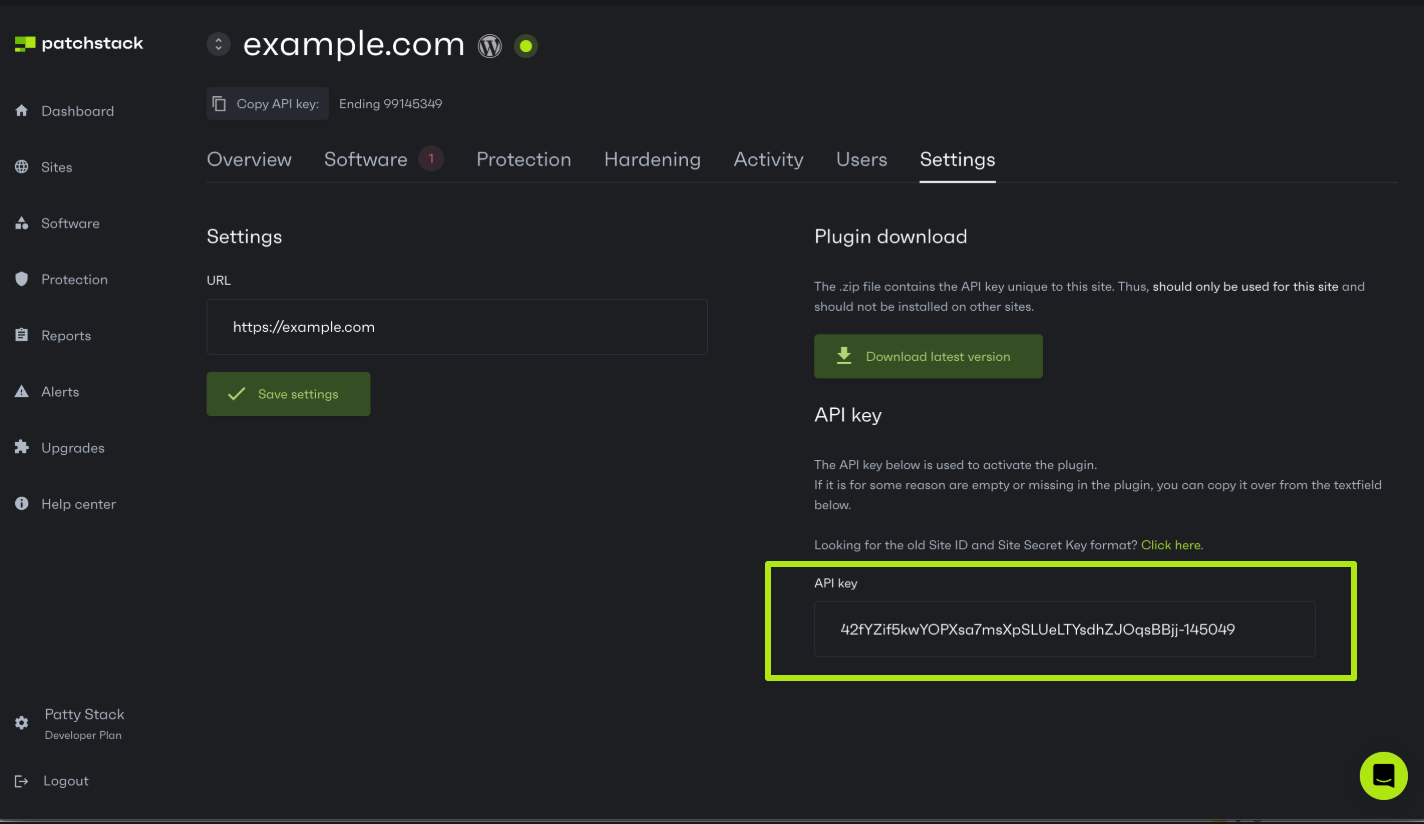
4. Copy the API key from there
5. Go to your WordPress admin, navigate to **Settings** > **Security** and insert the API key there
# Updating Patchstack from <= 2.0.20
Since we’ve rebranded from WebARX to Patchstack, the URL for our plugin in the WordPress plugin repository has changed. This may have caused your site to not show available updates.
To make sure you have the latest version of Patchstack, we recommend following these steps if you have Patchstack version 2.0.20 or lower installed:
1. Deactivate the old WebARX/Patchstack plugin (version 2.0.20 or lower). You can deactivate the Patchstack plugin by navigating to the **Plugins** page of your WordPress site. Find **Patchstack Security or WebARX** and click **Deactivate**
2. Download the newest version of the Patchstack plugin from the Patchstack App.\
Just open your site dashboard on Patchstack App and navigate to **Settings** from the submenu.\
Click **Download latest version**

3. Now navigate to your WordPress admin and go to the **Plugins** page. Click **Add New** from the top navigation. Then click **Upload Plugin**, choose the zip file from your filesystem, and click **Install Now**
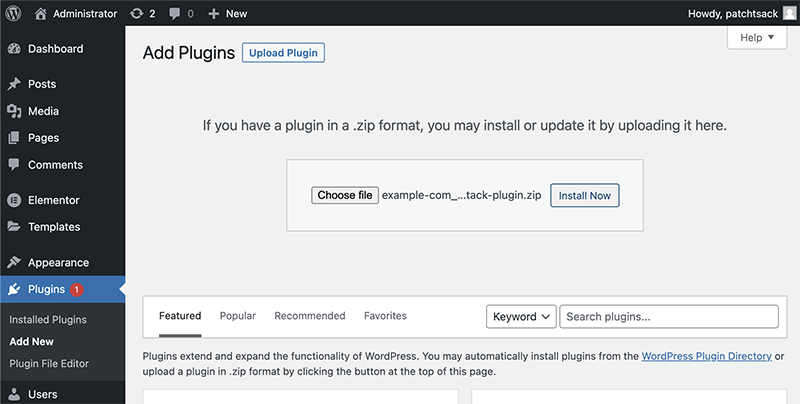
4. As the plugin is installed, scroll down and find **Patchstack Security** and click on **Activate**
5. Once activated, delete the old WebARX/Patchstack plugin (version 2.0.20 or lower)
6. After completing these steps, your site will be updated to the latest version of Patchstack plugin, and new updates will continue to be available in your WordPress admin area
If you have any questions or need assistance with this update, please don’t hesitate to reach out to our support team!
# Where do I find the API key to connect the Patchstack plugin?
To have the plugin connected with your site, you need to enter the API key from Patchstack App into your Patchstack plugin in WordPress. You can find this API key from your site settings on Patchstack App.\
Navigate to [](https://app.patchstack.com). Then
1. Click on **Sites** > **yourdomain.com**
2. From the submenu, click **Settings**
3. You will find the **API key** from the right column
4. Copy and paste it into your WordPress plugin

# Where is the Patchstack settings page on the plugin?
Since version 1.3.5, we moved the Patchstack settings page to its own page.
**Versions 1.3.5 up to 2.1.0**\
When we released version 1.3.5 of the Patchstack plugin, we moved the Patchstack settings page link from its own section to the “Settings” menu of WordPress. It can now be found under the “Security” sub-menu option of the “Settings” main menu.
**Versions 2.1.0+**\
Since version 2.1.0, the Patchstack settings are hidden by default and we encourage you to manage the Patchstack settings of your WordPress site through . If you do not wish to do this, you can go to **/wp-admin** > **Settings** > **Security**, and on this page click on the link at the bottom of the screen to turn on the setting management through WordPress.
**Upcoming version 2.2.13+** Settings management from the plugin is removed.
# Why is my site not working after updating the plugin?
In certain environments, PHP might have the OPCache extension installed which caches PHP scripts. If you update the plugin, it’s possible that a part of the PHP files of the Patchstack plugin is still cached and another part is no longer in the cache. This will cause fatal errors.
A solution to this is to restart the web server and/or PHP on your server.
If this does not fix the issue, please start a new chat with us and provide us with PHP errors from the error logs that are related to Patchstack.
# Pricing Plans - Frequently Asked Questions
* [Does Patchstack have a free version?](/faq-troubleshooting/pricing-plans/does-patchstack-have-a-free-version)
* [How does the annual plan pricing work and how will I be charged?](/faq-troubleshooting/pricing-plans/how-does-the-annual-plan-pricing-work-and-how-will-i-be-charged)
# Does Patchstack have a free version?
Patchstack has a free version available. Free version of Patchstack detects vulnerable software on your websites, and notifies you about these. Personal (Free) plan comes with 3 site slots, and protection can be applied individually for each site for $5 / month per site.
**With the Personal (Free) version:**
* You will be the first to know about new vulnerabilities.
* You will save time by monitoring all your websites from a single dashboard.
* You will be notified if any of the installed software has a security issues.
* You will get simple actionable suggestions to secure your websites.
* You will spend fewer resources fixing WordPress security issues (avoid expensive clean-ups).
* You can worry less about your website’s security and focus on your work.
**What does Patchstack Personal (Free) version include?**\
**Detect security issues before hackers take over your website:**
* Detect the latest security vulnerabilities in your WordPress or Drupal sites.
* Receive real-time alerts to email if any security vulnerabilities are found.
* Have a central security dashboard for up to 3 websites (via the Patchstack App).
**What’s the difference between a free version and paid version?** The free version of Patchstack only detects and notifies you about the vulnerabilities in the software versions your sites use. The paid version of Patchstack will also protect against malicious traffic and attacks exploiting known serious vulnerabilities on your site. The pricing for Patchstack protection starts from $5 / month per site.
### For WordPress
[Section titled “For WordPress”](#for-wordpress)
To use a free version of Patchstack with WordPress, install the [Patchstack plugin](https://wordpress.org/plugins/patchstack/) on your site first, and start the user registration flow from the plugin itself, after activating it on your WordPress.
### For Drupal
[Section titled “For Drupal”](#for-drupal)
To use a free version of Patchstack with Drupal, you’ll need to sign up for the Developer plan trial first. After that, you can downgrade your subscription from Developer plan to Personal plan (Free). Add your site to Patchstack App, and go through [this tutorial](https://docs.patchstack.com/patchstack-plugin/patchstack-connector/how-to-install-on-drupal/) to install the Patchstack connector to your Drupal site.
### Add protection to your sites
[Section titled “Add protection to your sites”](#add-protection-to-your-sites)
If you are interested in protection, you can either:
* Add up to 3 sites to the Personal plan, and activate protection for each site individually for $5 / site per month
* Sign up for the Developer plan to get more features with 25+ site slots
Check out Patchstack’s [pricing page here](https://patchstack.com/pricing/).
# How does the annual plan pricing work and how will I be charged?
**How does it work?**\
Once you start an annual plan with us, you will be charged for the entire amount right away and you will be charged every year for that amount unless you add more sites or activate different upgrades.
**What if I add more sites to my account?**\
If you add more WordPress sites to your account after you already paid, we will charge you at the end of the day depending on how many sites you added and how many days are left until the next invoice. For example, if you started your plan on January 1st and add 1 site on July 1st, we will charge you 50% of the amount. Once it’s January 1st again, you will be charged 100% for all sites and other services you have added to your account.
**What if I remove sites from my account?**\
If you have 3 sites and paid for them and you remove 1 site, you will not receive a refund but instead have 1 open slot that can be used to add another site to your account. If you decide to keep 1 slot open then the next invoice will only charge you for 2 sites and the open slot will be removed.
**What if I turn on/turn off upgrades or add more seats?**\
If you turn on upgrades such as the **volume upgrade** and **additional seat upgrade** to your account, you will be charged right away for these upgrades and at the end of the day for team members for the outstanding amount depending on how many days are left until the next invoice, as described above. Because upgrades are dynamic services, they are paid monthly, even if you are on an annual plan.
# Reports - Frequently Asked Questions
* [How to generate security reports?](/faq-troubleshooting/reports/how-to-generate-security-reports)
# How to generate security reports?
You can generate a website security report for each website you have connected with Patchstack App.\
Find the reports by you logging into your account and looking for Reports from your left-side menu in the Patchstack App.
Patchstack offers two types of security reports:
* Snapshot report\
Snapshot report is a current situational report of the website.
* Developer report (for Developer and Enterprise plan users)\
The developer report is a periodic PDF security report. It means you will need to pick a time period (for example a month), in which the data about your site is shown on the report.
[Read more about generating the reports here](/patchstack-app/reports/generating-reports/)
# Technical - Frequently Asked Questions
* [Can I use the same plugin API key for staging environment?](/faq-troubleshooting/technical/can-i-use-the-same-plugin-api-key-for-staging-environment)
* [Do I need to set up a CDN service for setting up the firewall?](/faq-troubleshooting/technical/do-i-need-to-set-up-a-cdn-service-for-setting-up-the-firewall)
* [Does Patchstack incorporate a CDN?](/faq-troubleshooting/technical/does-patchstack-incorporate-a-cdn)
* [Does Patchstack protect from DDoS attacks?](/faq-troubleshooting/technical/does-patchstack-protect-from-ddos-attacks)
* [Does Patchstack work with other captcha plugins?](/faq-troubleshooting/technical/does-patchstack-work-with-other-captcha-plugins)
* [How to add security headers with Patchstack?](/faq-troubleshooting/technical/how-to-add-security-headers-with-patchstack)
* [How to configure Patchstack to work with Cloudflare?](/faq-troubleshooting/technical/how-to-configure-patchstack-to-work-with-cloudflare)
* [List of IP addresses, that Patchstack servers use](/faq-troubleshooting/technical/list-of-ip-addresses-that-patchstack-uses)
* [Will Patchstack plugin help my site pass PCI-DSS, SOC2, ISO 27001 or other security checks?](/faq-troubleshooting/technical/will-patchstack-plugin-help-my-site-pass-pci-dss-soc2-iso-27001-or-other-security-checks)
* [How to fix "Improper HTTP to HTTPS redirection"?](/faq-troubleshooting/technical/how-to-fix-improper-http-to-https-redirection)
* [Does Patchstack work with nginx?](/faq-troubleshooting/technical/does-patchstack-work-with-nginx)
# Can I use the same plugin API key for staging environment?
Patchstack allows you to use the same plugin API key for the staging environment, and production (live) site.
**NB! The only requirement is that your staging site URL needs to contain any of the following phrases**:
```plaintext
'dev.',
'development.',
'staging.',
'beta.',
'alpha.',
'cloudwaysapps.com',
'kinsta.cloud',
'amazonaws.com',
'pantheonsite.io',
'devs',
'demo.',
'stage.',
'test.',
'azurecontainerapps',
'backup.',
'wpengine.com',
'wp-dv',
'optiserver.co.uk',
'azurewebsites.net',
'.myftpupload.com',
'.mwp.accessdomain.com',
'store.godaddy.com'
```
### How the staging and production site work with Patchstack?
[Section titled “How the staging and production site work with Patchstack?”](#how-the-staging-and-production-site-work-with-patchstack)
Patchstack will work normally with your live site, if you share the same API key with staging environment - if the staging URL contains any of the phrases given above. Some things to keep in mind:
* Your production (live) site receives all the real-time protection rules
* All custom hardening rules set in Patchstack App are also synced normally
* All the features that Patchstack offers, will work on your live site (like custom rules, etc)
* On the staging site however, only the API key license check will work. Other features and firewall rules are not synced to the staging site
* We recommend turning on the server level protection for your staging site (e.g. htaccess and htpasswd)
**Example case:**
* Live URL is example.com
* Staging URL is staging.example.com
* Only example.com is added to the Patchstack App
* The Patchstack plugin with the same API key will be added to both staging.example.com and example.com
* The domain example.com will have all the firewall rules and other Patchstack features
* The domain staging.example.com will only pass the license checker, but has no protection
* The domain staging.example.com should be protected on server level, so no third person/bot could access it
### How to set up the staging and production (live) environment?
[Section titled “How to set up the staging and production (live) environment?”](#how-to-set-up-the-staging-and-production-live-environment)
1. Add your production (live) site URL to the Patchstack App
2. Download the plugin and install it to your staging site
3. Activate the plugin
4. Push the staging site to production
# Do I need to set up a CDN service for setting up the firewall?
You don’t need to set up a CDN service for setting up the firewall. With Patchstack, you only need to install the plugin to enable the firewall.
# Does Patchstack incorporate a CDN?
Patchstack is fully on the application level to make it as easy as possible to add your applications.
You only need to install a WordPress plugin for firewall and hardening (which is done automatically), vulnerability monitoring, blacklist checks, and all other features that are working remotely via the Patchstack App.
# Does Patchstack protect from DDoS attacks?
Patchstack does not protect from DDoS attacks, but it does limit the intrusions on the IP level. IP’s that do malicious requests get IP block incrementally (30 minutes and each time going up).
Please ask more about network-level DDoS protection from your hosting provider.
# Does Patchstack work with nginx?
If your server runs nginx, then the .htaccess functionality won’t work.
Apache has a feature that allows you to use a .htaccess file to easily implement or override rewrite rules on your site, but nginx does not have such a feature. In order for the rewrite rules to work, you must implement the nginx rules manually.
If you’re not sure how to do this, you should ask your host for further assistance since it varies by the host how the nginx configuration works and is implemented. Some hosts provide you with access to an nginx.conf file in the root of your site, but this is not a universal standard so we do not attempt to write to this file.
The official rewrite rules for nginx can be found below. This needs to be added to the server directive in the nginx configuration file of your site.
```typescript
# Patchstack nginx protection rules.
# Disable directory listing and server signature
autoindex off;
server_tokens off;
# Block access to certain files.
location ~* \.(htaccess|htpasswd|errordocs|logs|log)$ {
return 403;
}
rewrite ^/readme\.html$ /index.php?webarx_fpage=101 break;
rewrite ^/license\.txt$ /index.php?webarx_fpage=102 break;
rewrite ^/wp-config\.php$ /index.php?webarx_fpage=103 break;
rewrite ^/wp-admin/includes/ /index.php?webarx_fpage=201 break;
rewrite ^/wp-includes/[^/]+\.php$ /index.php?webarx_fpage=202 break;
rewrite ^/wp-content/uploads/(.*)\.php$ /index.php?webarx_fpage=202 break;
rewrite ^/wp-includes/js/tinymce/langs/.+\.php /index.php?webarx_fpage=203 break;
rewrite ^/wp-includes/theme-compat/ /index.php?webarx_fpage=204 break;
rewrite ^/debug\.log$ /index.php?webarx_fpage=502 break;
if ($remote_addr != "18.221.197.243"){
rewrite ^/(.*)/plugins/(.*)readme\.(txt|html)$ /index.php?webarx_fpage=19 break;
}
# Prevent proxy comments.
if ($http_cookie !~* "^.*wordpress_logged_in.*$"){
set $blockcomment A;
}
if ($request_method = POST){
set $blockcomment "${blockcomment}B";
}
if ($http_via){
set $blockcomment "${blockcomment}C";
}
if ($http_forwarded){
set $blockcomment "${blockcomment}C";
}
if ($http_useragent_via){
set $blockcomment "${blockcomment}C";
}
if ($http_x_forwarded_for){
set $blockcomment "${blockcomment}C";
}
if ($http_x_forwarded_host){
set $blockcomment "${blockcomment}C";
}
if ($http_proxy_connection){
set $blockcomment "${blockcomment}C";
}
if ($http_xproxy_connection){
set $blockcomment "${blockcomment}C";
}
if ($http_http_pc_remote_addr){
set $blockcomment "${blockcomment}C";
}
if ($http_http_client_ip){
set $blockcomment "${blockcomment}C";
}
if ($blockcomment ~ "ABC"){
rewrite ^/wp-comments-post\.php$ /index.php?webarx_fpage=7 break;
}
```
# Does Patchstack work with other captcha plugins?
Patchstack plugin can add either Google ReCAPTCHA or Cloudflare Turnstile to your login page, but it may not work with other plugins.
Patchstack, by default, has the captcha features turned off. You can pick to which pages you would like to add the capcha — login, register, forgot password, and comments.
Note that Patchstack’s captcha works with WordPress’s built-in forms and WooCommerce forms, but not with other plugins’ forms.
If you turn this feature on and have a different plugin installed that has the same kind of functionality, you may get locked out of your WordPress site. In this scenario, you’d have to delete either plugin to regain access to your site.
# How to add security headers with Patchstack?
If you have the Patchstack plugin installed, we will automatically try to inject the security headers into the response.
Because these headers can be injected into the HTTP response at runtime, they may not appear in your `.htaccess` file even when they are active. To confirm which headers are being sent, check the live response (for example with [securityheaders.com](https://securityheaders.com/)) instead of reading `.htaccess`. Avoid adding the same headers both automatically and manually, or you may end up with duplicate headers. For how these settings relate to each other, see [How hardening and security headers work](/patchstack-app/site-dashboard/hardening/hardening-and-security-headers-explained/).
If this does not work, perhaps due to an aggressive caching plugin or caching/proxy server, you may have to manually add the .htaccess rules below to your .htaccess file.
## Adding the security headers automatically
[Section titled “Adding the security headers automatically”](#adding-the-security-headers-automatically)
To automatically add the security headers, you need to navigate to the Patchstack App or Patchstack plugin in your WordPress dashboard.
**How to do it in the Patchstack App?**
1. Navigate to your site from the Patchstack App > Sites
2. Click on the Hardening tab
3. Click on the .htaccess sub-tab
4. Switch on the option “Add security headers”
5. Scroll down and click **Save settings**
## Adding the security headers manually
[Section titled “Adding the security headers manually”](#adding-the-security-headers-manually)
You can manually add the following security headers into the .htaccess file if you use **Apache**:
```
Header set Referrer-Policy "strict-origin-when-cross-origin"
Header set X-XSS-Protection "1; mode=block"
Header set X-Content-Type-Options "nosniff"
Header set X-Frame-Options "SAMEORIGIN"
Header set Strict-Transport-Security "max-age=31536000"
Header unset X-Powered-By
```
If you are running **nginx**, add the following to the nginx configuration file and restart or reload nginx:
```
add_header X-Frame-Options SAMEORIGIN;
add_header X-Content-Type-Options nosniff;
add_header X-XSS-Protection "1; mode=block";
add_header Strict-Transport-Security "max-age=31536000";
add_header Referrer-Policy "strict-origin-when-cross-origin";
```
Additionally, in order to permanently remove the X-Powered-By header instead of using the above changes, set the expose\_php value of your PHP configuration to “Off”. You may have to ask your host to make the above changes.
## More help
[Section titled “More help”](#more-help)
A more detailed guide about security headers can be found in this article: [](https://patchstack.com/articles/wordpress-security-headers/)
In case you need help, turn to our support chat - just click the green chat bubble at the bottom right corner!
# How to configure Patchstack to work with Cloudflare?
The following steps should only be taken if your site is properly configured behind a Cloudflare proxy. On misconfigured sites, this could allow for IP address spoofing to exist which could potentially lead to a DoS attack
### IP address header
[Section titled “IP address header”](#ip-address-header)
In order for Patchstack to properly work with Cloudflare, we recommend that you configure the IP address header override option.
1. Go to **Patchstack App** > **Sites** > **yourdomain.com** > **Protection** > **Additional settings**
2. To the **IP Address Header Override** input, type **HTTP\_CF\_CONNECTING\_IP**
3. Save the settings
This will tell Patchstack to grab the real visitors' IP addresses.
### Support for TLS 1.2 is required
[Section titled “Support for TLS 1.2 is required”](#support-for-tls-12-is-required)
Cloudflare supports only TLS 1.3 by default. To use Patchstack, additional support for TLS 1.2 is required. To add support for this TLS version in Cloudflare:
1. Login at Cloudflare, and click on your domain name
2. In the menu, go to SSL/TLS > Edge Certificates
3. Scroll down to the “Minimum TLS Version” section
4. Ensure that it is set to at least TLS 1.2 or lower
### Custom rules
[Section titled “Custom rules”](#custom-rules)
Sometimes due to specific settings in Cloudflare, you may need to whitelist Patchstack’s IP addresses. [Click here](https://docs.patchstack.com/faq-troubleshooting/technical/list-of-ip-addresses-that-patchstack-uses/) to see all the IP addresses that Patchstack servers use.
In case there are still problems with connecting Patchstack, an additional Cloudflare rule that might work is to pass the request if the query string contains “\_wcb” or query parameter “\_wcb” is set.
# How to fix "Improper HTTP to HTTPS redirection"?
When your site does not properly redirect HTTP requests to HTTPS, a Man-In-The-Middle attack may be possible.
It must redirect straight from the HTTP to the HTTPS version of your site with no additional HTTP redirects in between.
In order to fix this on a WordPress site, first make sure your site is available over HTTPS (you might have to ask your host regarding this matter). If it is available over HTTPS, we recommend that you install the “Really Simple SSL” plugin. After the plugin setup, it may take up to 12 hours before the HTTPS/SSL error in the app is resolved.
**Apache**\
If you do not run a WordPress site, you can create a .htaccess file in the root of your website (or modify existing one) through FTP or a file manager in cPanel/WHM/Plesk and add the following (make sure to change the domain name on the last line):
```typescript
RewriteEngine On
RewriteCond %{SERVER_PORT} 80
RewriteRule ^(.*)$ https://www.yourdomain.com/$1 [R,L]
```
**Nginx**\
It’s a bit more technical to do this for Nginx, as you probably need root access to modify the Nginx web server configuration settings.
The easiest way is to set up a listener for port 80 (HTTP), which redirects traffic with a 301 permanent redirect to the port 443 (HTTPS) listener.
# List of IP addresses, that Patchstack servers use
Sometimes you need to whitelist our IP addresses in order to avoid your hosting provider or (secondary) firewall blocking our services.
You can use these two API endpoints to get the list of IP addresses that Patchstack uses:
* [patchstack.com/ips-v4/](https://patchstack.com/ips-v4/)
* [patchstack.com/ips-v6/](https://patchstack.com/ips-v6/)
Note that we may add and remove IP addresses at any time without notice.
# Will Patchstack plugin help my site pass PCI-DSS, SOC2, ISO 27001 or other security checks?
The Patchstack plugin can help, but patching is up to you. The plugin will inform you if your website(s) are running any known insecure components and allow you to be sure your applications are running secure versions before your test or auditing date.
# Adding your first site
In this article, we will show, how you can add and connect your first website with Patchstack App. You can watch this [tutorial video](https://www.youtube.com/watch?v=MFmPFzSaD3I) below, or follow the steps in the next chapter.
## Steps for adding your first site
[Section titled “Steps for adding your first site”](#steps-for-adding-your-first-site)
To add the first site, make sure you are logged into Patchstack App. Then follow these steps.
1. Navigate to [**Dashboard**](https://app.patchstack.com/dashboard). Then, click on the green **Connect site** button. 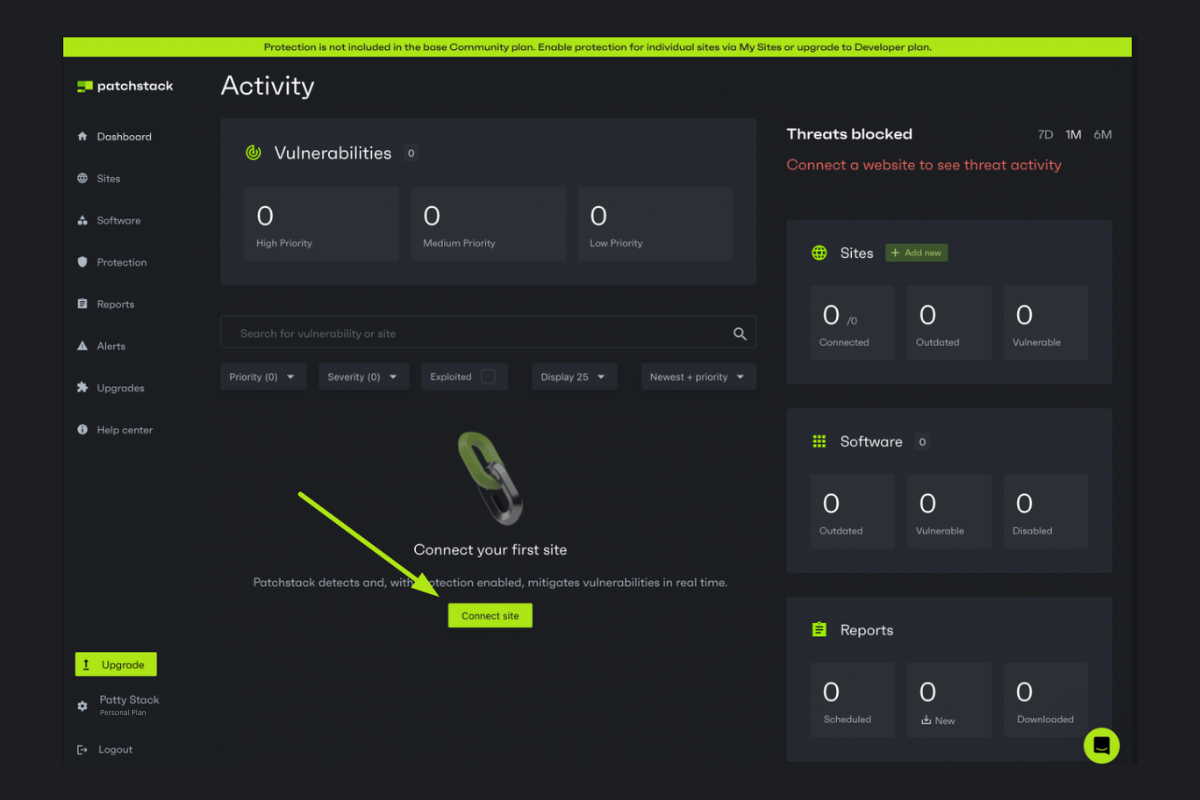 A dialogue will open asking you for your domain URL.
2. Enter the domain name to the input. You can switch between http/https by clicking on the arrows
3. Click **Continue to plugin sync** 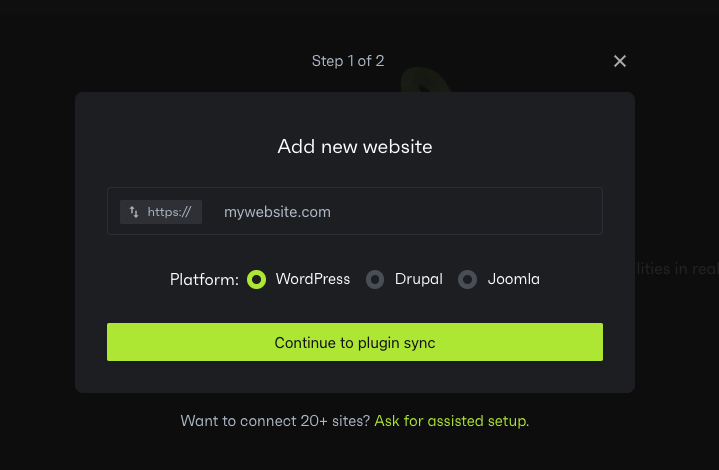
4. You will be taken to the next step, where you can get the API key or download the plugin .zip file.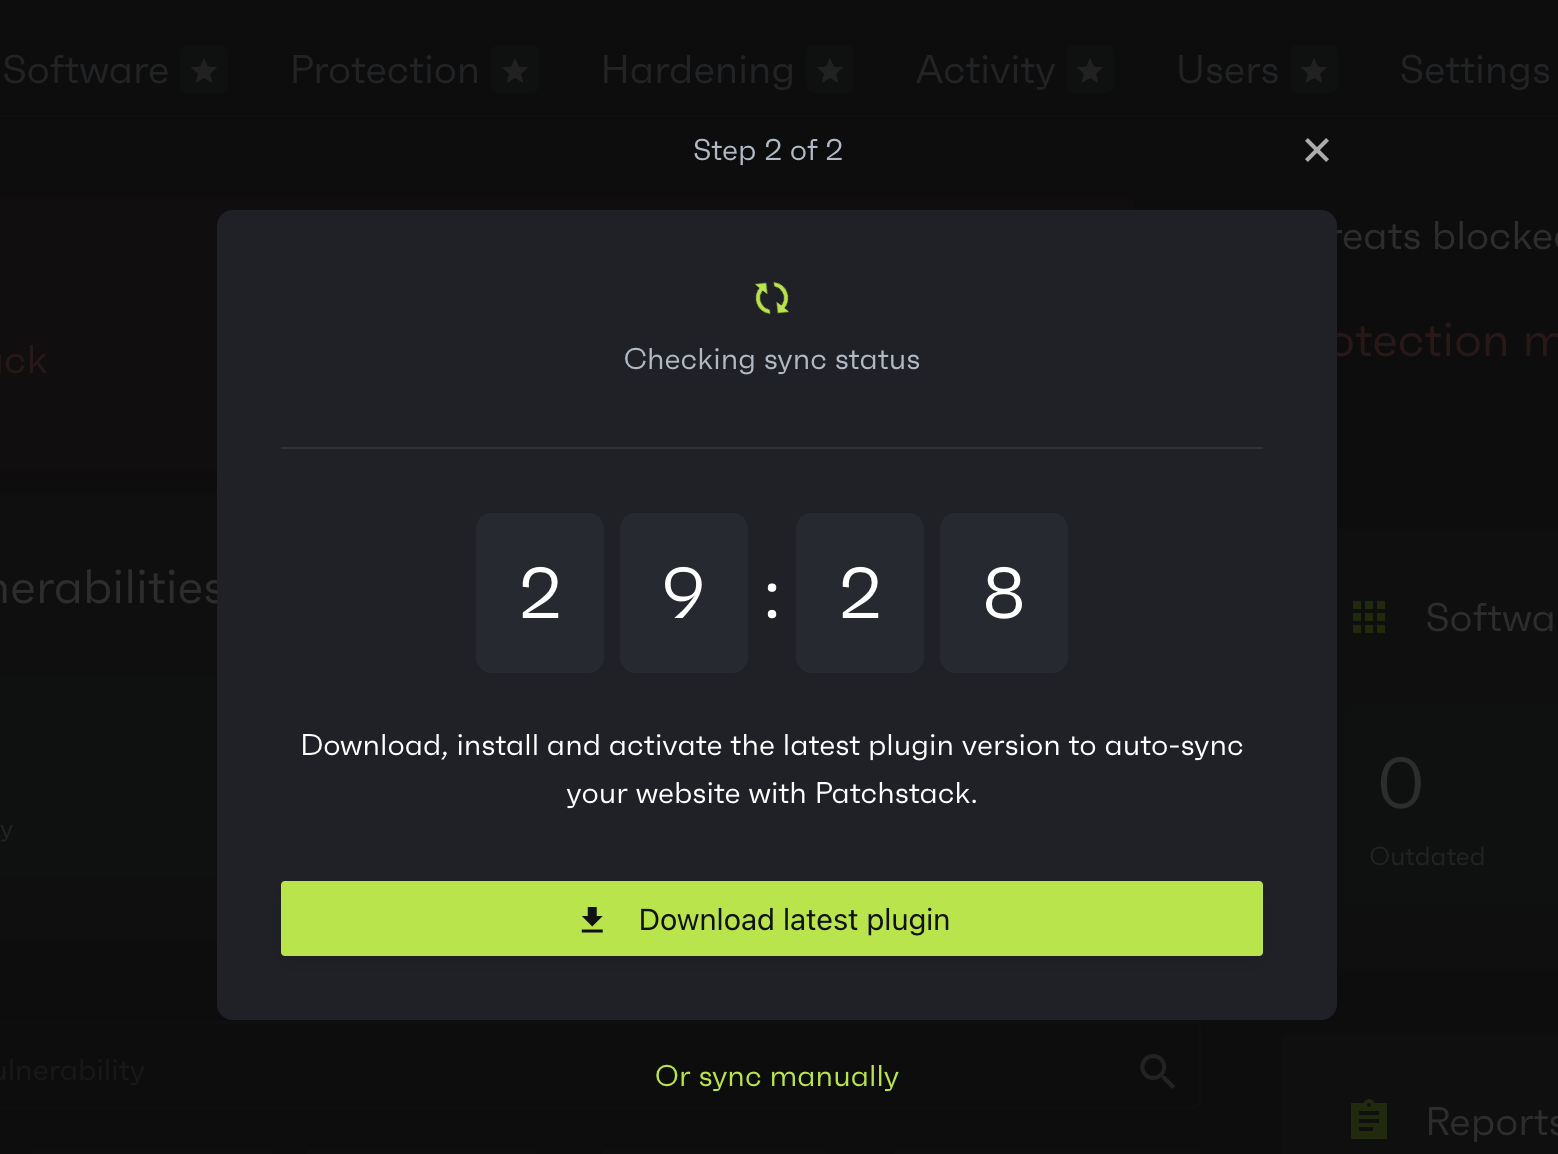
5. If you upload the Patchstack plugin to your site within 30 minutes, Patchstack will automatically sync all the data. In case this 30 minute exceeds, then you need to click **Resync** in the dialogue, after uploading the plugin.
6. To install the plugin, follow [these steps](/getting-started/installing-patchstack/installing-via-zip/).
**What if I already had the Patchstack plugin installed before adding it to Patchstack App?**
If you already have the Patchstack plugin installed on your site, you can click **Or sync manually** in the Patchstack App site adding flow, and get the API key. You will have to insert this API key into your WordPress plugin. To do that, go to wp-admin > Settings > Security > Change API key. Copy the key there and click **Sync**
# Installing the Patchstack plugin
Patchstack can be connected with WordPress in two ways:
* manually uploading the .zip file to your WordPress site (with API key pre-inserted)
* installing the plugin from your WordPress admin and adding the API key manually
*Patchstack plugin itself can be found from WordPress repository: [](https://wordpress.org/plugins/patchstack/)*
# Installing on JavaScript / Node.js projects
Patchstack monitors JavaScript and Node.js applications — not only WordPress sites — through [`@patchstack/connect`](https://www.npmjs.com/package/@patchstack/connect), the official Patchstack connector package, maintained and published by Patchstack on npm under the `@patchstack` organization.
* **npm:**
* **Source (MIT-licensed):**
* **Setup guide:**
## What it does
[Section titled “What it does”](#what-it-does)
The connector reads the project’s dependency lockfile (`package-lock.json`, `pnpm-lock.yaml`, or `yarn.lock`; bun projects are detected via `node_modules/`) and reports package names and versions to Patchstack, which matches them against its vulnerability database and notifies you when a dependency needs patching. It works with any framework — Next.js, Vite, Nuxt, Remix, SvelteKit, TanStack Start, plain Node — and with npm, pnpm, yarn, and bun.
It sends dependency names and versions only: no source code, no environment variable values, no file paths, no git history.
## Install
[Section titled “Install”](#install)
No signup, dashboard step, or UUID is needed up front. Install the package as a development dependency, then run `setup`:
```bash
npm install --save-dev @patchstack/connect # or: pnpm add -D / yarn add -D / bun add -d
npx --no-install patchstack-connect setup
```
`setup` applies a bounded, idempotent set of changes and nothing else:
1. **Scans the lockfile and sends the dependency manifest** (package names and versions) to Patchstack.
2. **Provisions a Patchstack site** on the first run and writes its UUID to `.patchstackrc.json` (commit this file); later runs reuse the existing site instead of creating a duplicate.
3. **Manages the disclosure-widget tag** in the project’s root HTML shell (the first of `index.html`, `public/index.html`, or `src/app.html` that exists) — see the widget section below.
4. **Adds production build integration to `package.json`:** `scan` runs before the build and `mark-build` after it, via `prebuild`/`postbuild` lifecycle hooks (or a direct build chain on bun, which skips npm-style hooks). Existing build commands are preserved, dev scripts are untouched, and `setup` never runs the build itself.
5. **Prints a status checklist** of anything that still needs a manual step, such as framework-specific widget placement.
`setup` ends by printing a **dashboard link**. The CLI never opens the link and never asks for Patchstack credentials — open it in your browser and sign in to see the vulnerability reports. The site is monitored either way; connecting it to an account is what makes the reports visible to you.
### Connecting straight to your account
[Section titled “Connecting straight to your account”](#connecting-straight-to-your-account)
If you start from the app — **Sites → Add new → AI-assisted** — and tick **Connect this website to my account automatically**, the message it gives you to paste into your assistant carries a **claim token** for your account, and the assistant runs `setup` with it:
```bash
npx @patchstack/connect setup --claim-token
# or: PATCHSTACK_CLAIM_TOKEN= npx @patchstack/connect setup
```
The site is then created already attached to your account, `setup` prints your dashboard link for it, and the app’s **Connect website** panel picks the site up on its own. The token names your account, not the project: it is never written to `.patchstackrc.json` or the credential file, and it stops working after a day. An expired or unrecognised token does not break the install — the site is created unattached, exactly as it would be without one, and `setup` prints the dashboard link to connect it by hand.
`setup` never runs the `protect` command (see below).
### Manual alternative
[Section titled “Manual alternative”](#manual-alternative)
The same pieces can be applied individually: `npx @patchstack/connect scan` performs steps 1–3, and the build hooks can be added by hand:
```jsonc
{
"scripts": {
"prebuild": "patchstack-connect scan",
"postbuild": "patchstack-connect mark-build"
}
}
```
Run `npx @patchstack/connect guide` at any time for a project-aware checklist of what is present and what is missing, with commands tailored to the project. `npx @patchstack/connect status` re-prints the site UUID and dashboard link.
## The disclosure widget
[Section titled “The disclosure widget”](#the-disclosure-widget)
The connector installs Patchstack’s **vulnerability disclosure widget** — a floating “Report a vulnerability” button — so anyone who spots an issue can report it straight to you. The widget is a single script tag loading `https://cdn.patchstack.com/patchstack-widget.js`, configured with the site UUID (which is public by design — it ships in client-side HTML and is not a secret). A pre-existing manually placed widget tag is left untouched, and `mark-build` ensures the tag in build output (`dist/`, `build/`, `out/`, `.output/public`) without ever editing source.
Frameworks without a static HTML shell need a one-line placement in the root layout; `guide` prints the exact snippet for the detected framework, and the [widget reference](https://cdn.patchstack.com/llm.html) covers additional patterns.
To run without the widget, set `"widget": false` in `.patchstackrc.json` — this disables all widget management; otherwise the next scan re-adds the tag.
The floating button is **hidden by default**: it appears only when the widget is told to show it, via `data-report-form="true"` on the script tag or the widget’s own Settings. To reach your dashboard while the button is hidden, open any page of your site with `#patchstack` appended to the URL. See [Troubleshooting JS / Node.js](/getting-started/installing-patchstack/troubleshooting-javascript-node-projects/) if the widget still does not appear.
### Signing in to the widget on your site
[Section titled “Signing in to the widget on your site”](#signing-in-to-the-widget-on-your-site)
The widget’s sign-in form leads with **Continue with Patchstack**: one click signs you in with the account you are already signed in to at app.patchstack.com — no password, no provider round trip, and it works for SSO and two-factor accounts too. In Chrome and Edge the button already names your account (“Continue as …”); Safari and Firefox do not let the widget see that, so there it is unnamed but works the same way. If you are not signed in to app.patchstack.com in that browser, the widget says so and the e-mail, Google, GitHub and LinkedIn options are right underneath.
## The `protect` command
[Section titled “The protect command”](#the-protect-command)
The package also ships an **opt-in** `protect` command: a runtime exploit guard, currently for TanStack Start + Supabase applications, which patches the app’s Supabase client to route traffic through a same-origin guard. It modifies application code and runs **only** when explicitly invoked — `setup`, `scan`, `guide`, `status`, and `mark-build` never invoke it. If you don’t run `protect`, no application code is changed beyond the widget tag and `package.json` scripts described above.
## Security and data handling
[Section titled “Security and data handling”](#security-and-data-handling)
* **Data sent to Patchstack:** dependency package names and versions from the lockfile, plus a build fingerprint from `mark-build`. No source code, environment variable values, file paths, or git history is transmitted.
* **Files written locally:** `.patchstackrc.json` (site UUID and settings), the widget script tag in the root HTML shell, and the `scan`/`mark-build` entries in `package.json` scripts. `mark-build` additionally stamps build output, never source.
* **External resources:** the widget script is loaded in the browser from `https://cdn.patchstack.com/patchstack-widget.js`. The CLI itself downloads and executes nothing from a URL.
* **Dashboard link:** printed to the terminal only; the CLI never opens it and never asks for credentials.
## Uninstalling
[Section titled “Uninstalling”](#uninstalling)
1. Note the site UUID from `.patchstackrc.json` before deleting anything — it identifies the site in the dashboard.
2. Remove the widget tag (and any `PatchstackWidget.init(...)` call) from the layout or HTML shell.
3. Remove the `patchstack-connect scan` / `patchstack-connect mark-build` parts from `package.json` scripts, keeping any chained commands.
4. Uninstall with the manager matching the lockfile: `npm uninstall` / `pnpm remove` / `yarn remove` / `bun remove` `@patchstack/connect`.
5. Delete `.patchstackrc.json` and any `PATCHSTACK_SITE_UUID` environment variables.
Reporting stops immediately. Local removal does not delete the site record on Patchstack’s side: an unclaimed site is an anonymous record that stops receiving reports; a claimed site can be removed in the dashboard at .
## Troubleshooting
[Section titled “Troubleshooting”](#troubleshooting)
A widget that never appears, a published site serving an old build, a broken config file, or a connector stuck on an old version are all covered — with copy-paste prompts for AI site builders — in [Troubleshooting JavaScript / Node.js projects](/getting-started/installing-patchstack/troubleshooting-javascript-node-projects/).
## How this relates to host-level npm protection
[Section titled “How this relates to host-level npm protection”](#how-this-relates-to-host-level-npm-protection)
Hosting partners can enable npm vulnerability intelligence for the sites they host through the partner-level [Threat Intelligence API npm features](/api-solutions/threat-intelligence-api/npm-features/). That integration is applied by the host at the infrastructure level. `@patchstack/connect` is the complementary self-service path: developers install it directly into their own projects, whether or not their host is a Patchstack partner. Both feed the same vulnerability database.
# Installing via WordPress repository
Let’s set up the Patchstack plugin through WordPress!\
First, log in to your WordPress.\
Navigate to “Plugins” from the admin menu and click “Add New” from the top.
1. On the right side you see the “Search plugins…” search box.
2. Type **“Patchstack”** to search box
3. Click on **“Install Now”** button
4. Click **“Activate”** 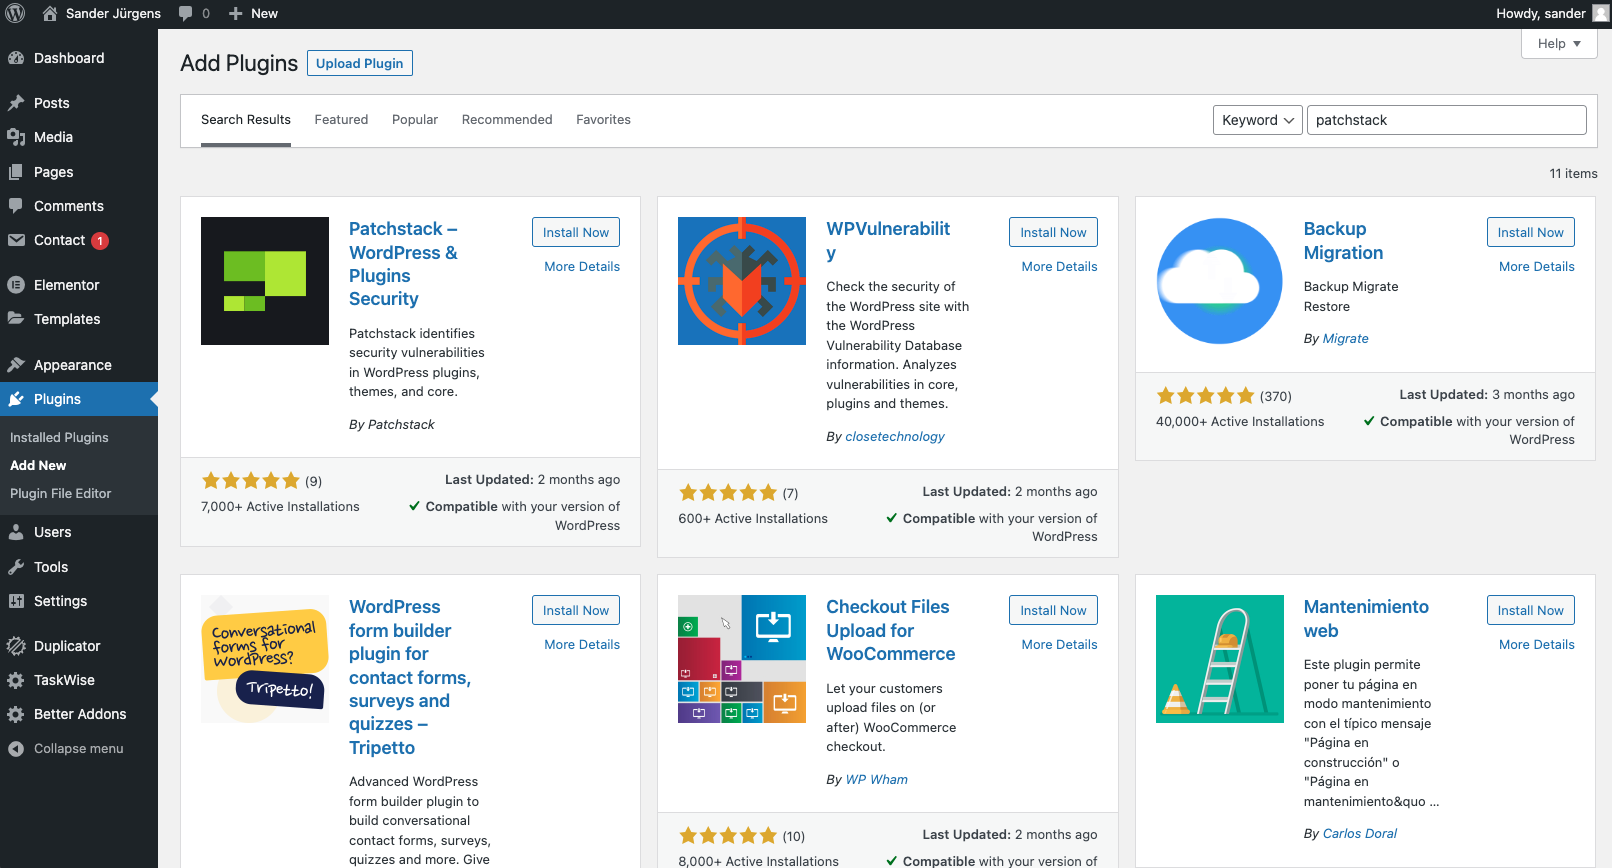
5. You are now taken to the Patchstack plugin’s setup screen, where you need to enter the Patchstack API key.
6. In Patchstack App, navigate to **My Sites > yourdomain.com > Settings**, to find and copy the **API key**. See image below: 
7. To connect the plugin with Patchstack App, you need to paste your site **API key** into the plugin API field. 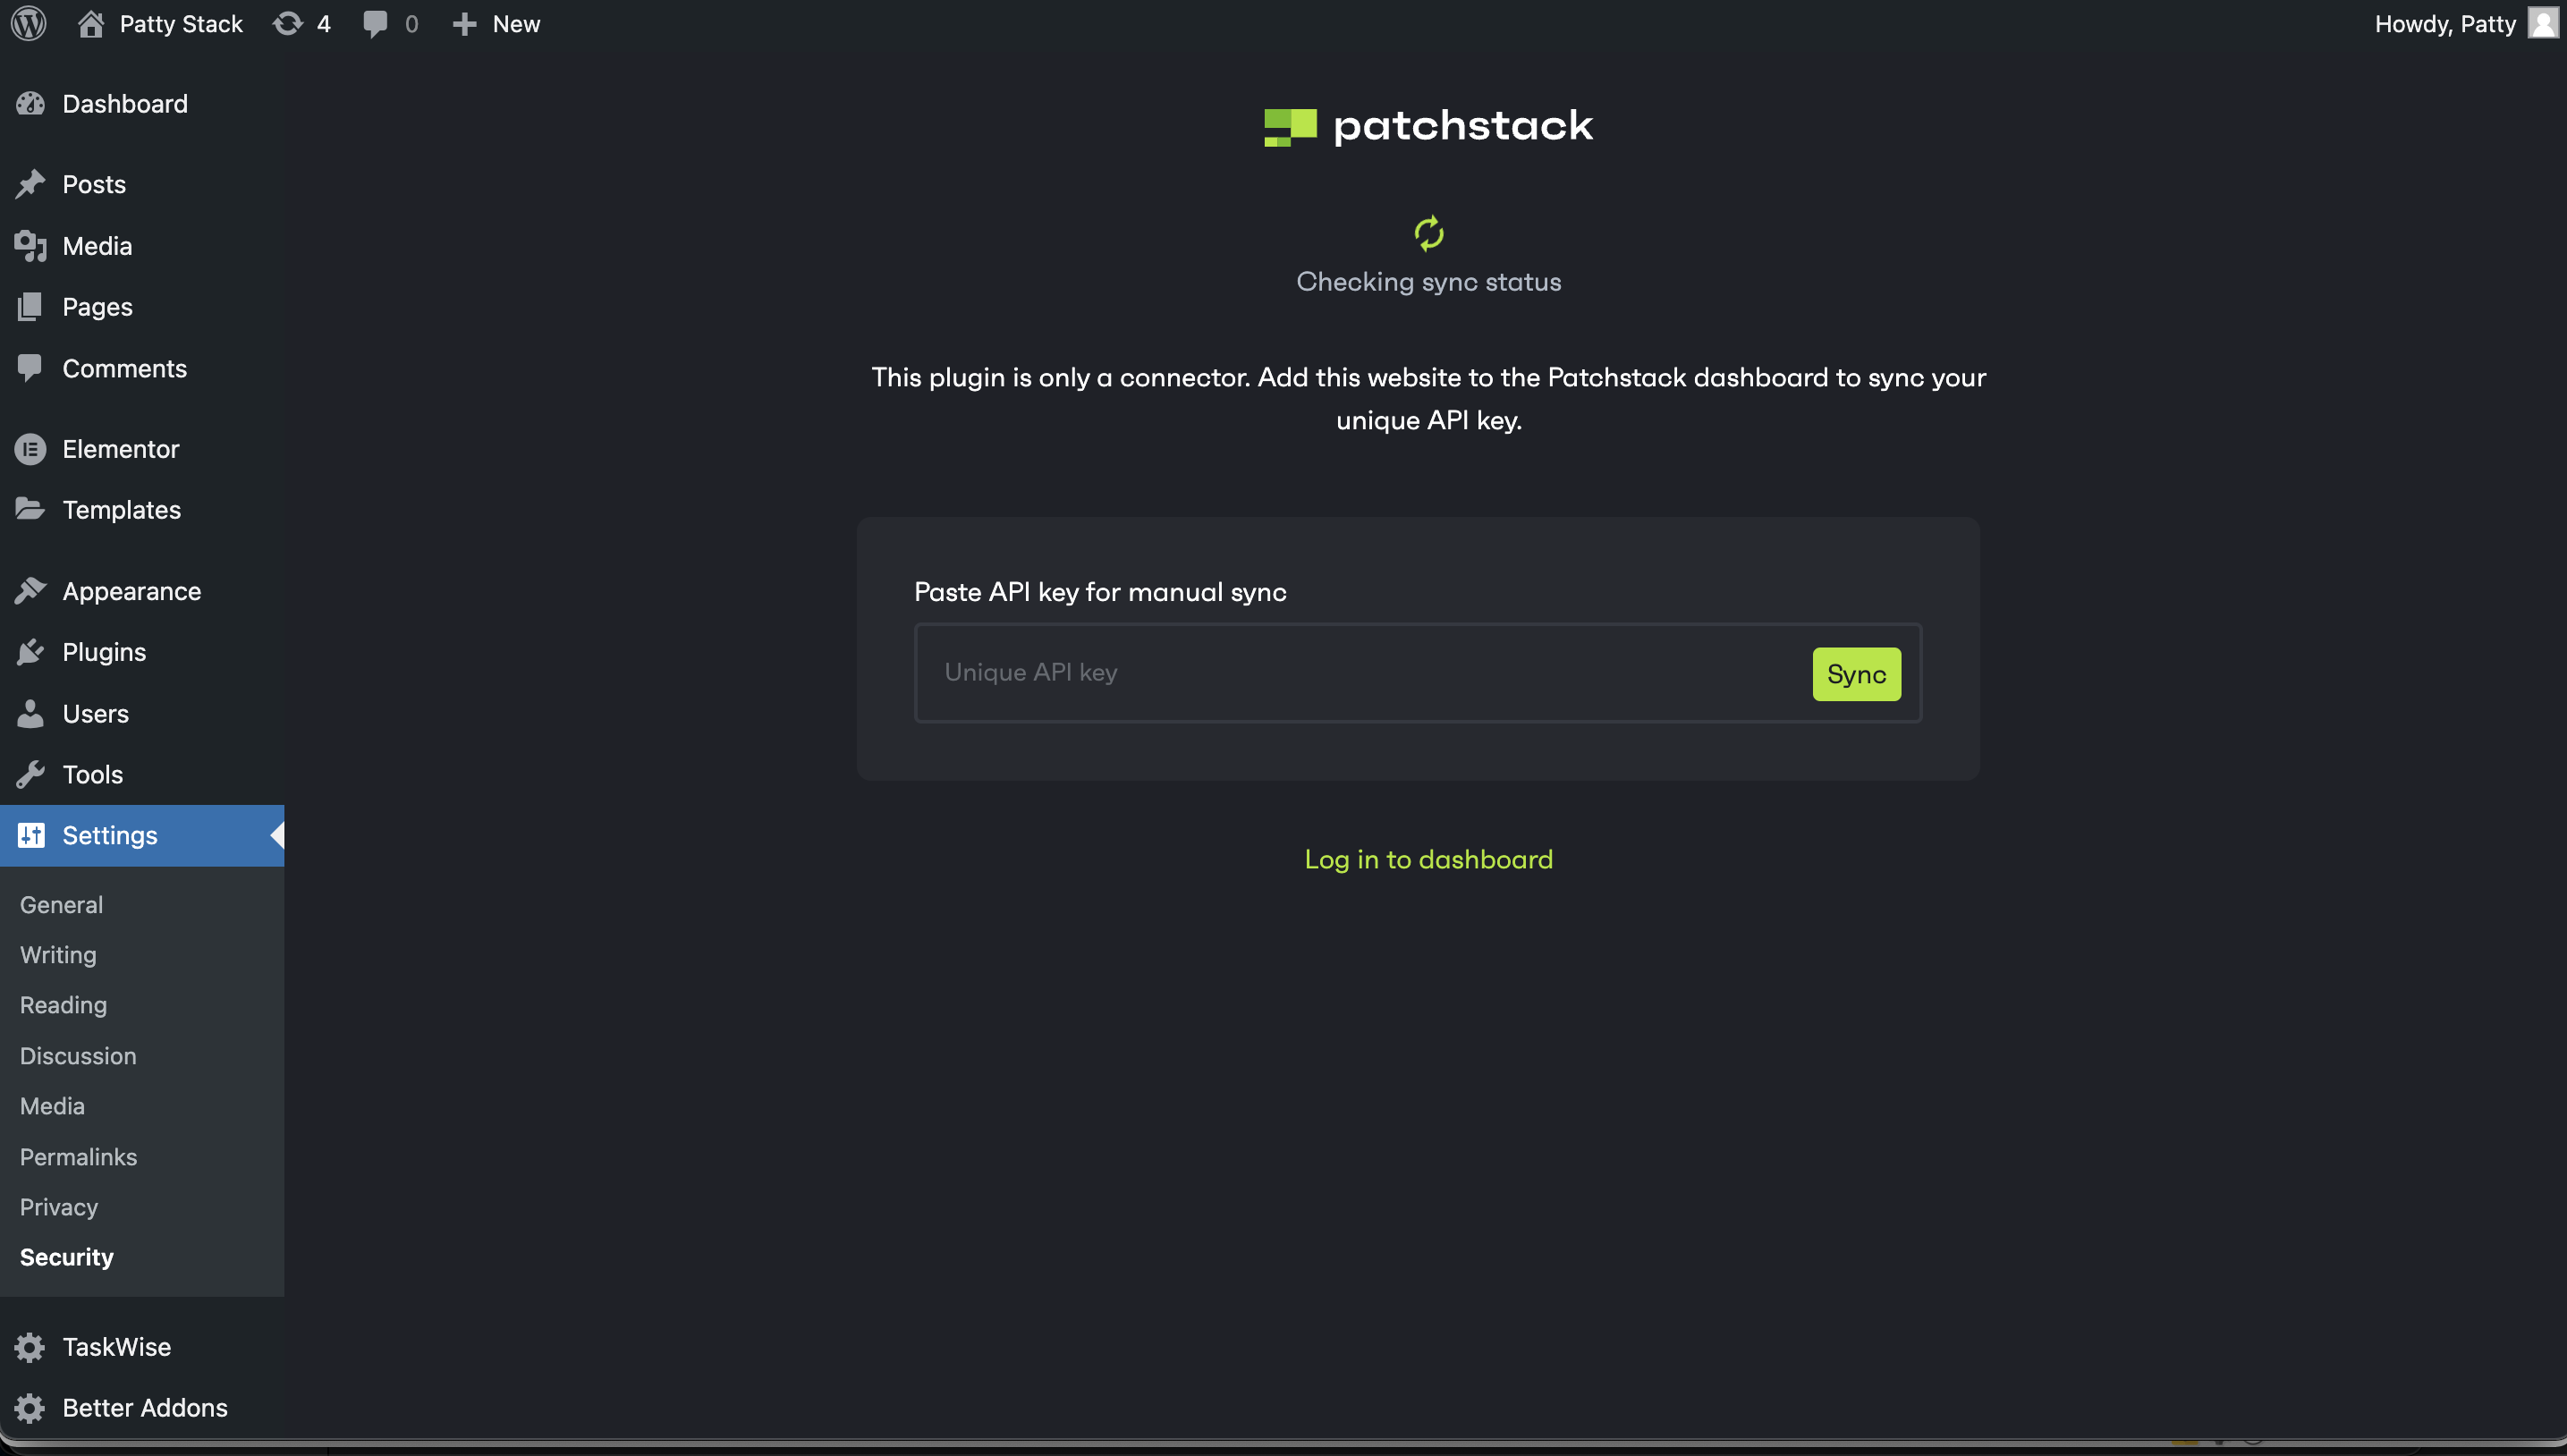
8. Click **Sync** in WordPress plugin.
**Congratulations** - After completing all previous steps, Patchstack should now be up and running on your site!\
If you want to have your site protected by our vPatches and other firewall rules, you can click on **Activate for $5 on the App** button. You will be directed to set up billing to enable the Patchstack protection.
# Installing via .zip
## 1. Download the .zip file
[Section titled “1. Download the .zip file”](#1-download-the-zip-file)
Once you have added your domain name to Patchstack App and clicked **Continue to plugin sync**, you will see a prompt, which lets you download the Patchstack plugin .zip file.\
Click on the **Download latest plugin**. 
Additionally, the plugin file can be found on the **Settings** page of your site in Patchstack. On the settings page, there is a button **Download latest plugin**.
## 2. Upload the plugin to your site
[Section titled “2. Upload the plugin to your site”](#2-upload-the-plugin-to-your-site)
To upload the .zip file to WordPress:
1. Go to your WordPress admin
2. Click **Plugins** > **Add new plugin**
3. Click on **Upload Plugin**
4. Choose the Patchstack plugin .zip file from your computer, and click **Install Now**
5. Once the plugin is installed, click **Activate Plugin**
6. You’ll then see a screen as below, that means the plugin has been successfully connected to the Patchstack App 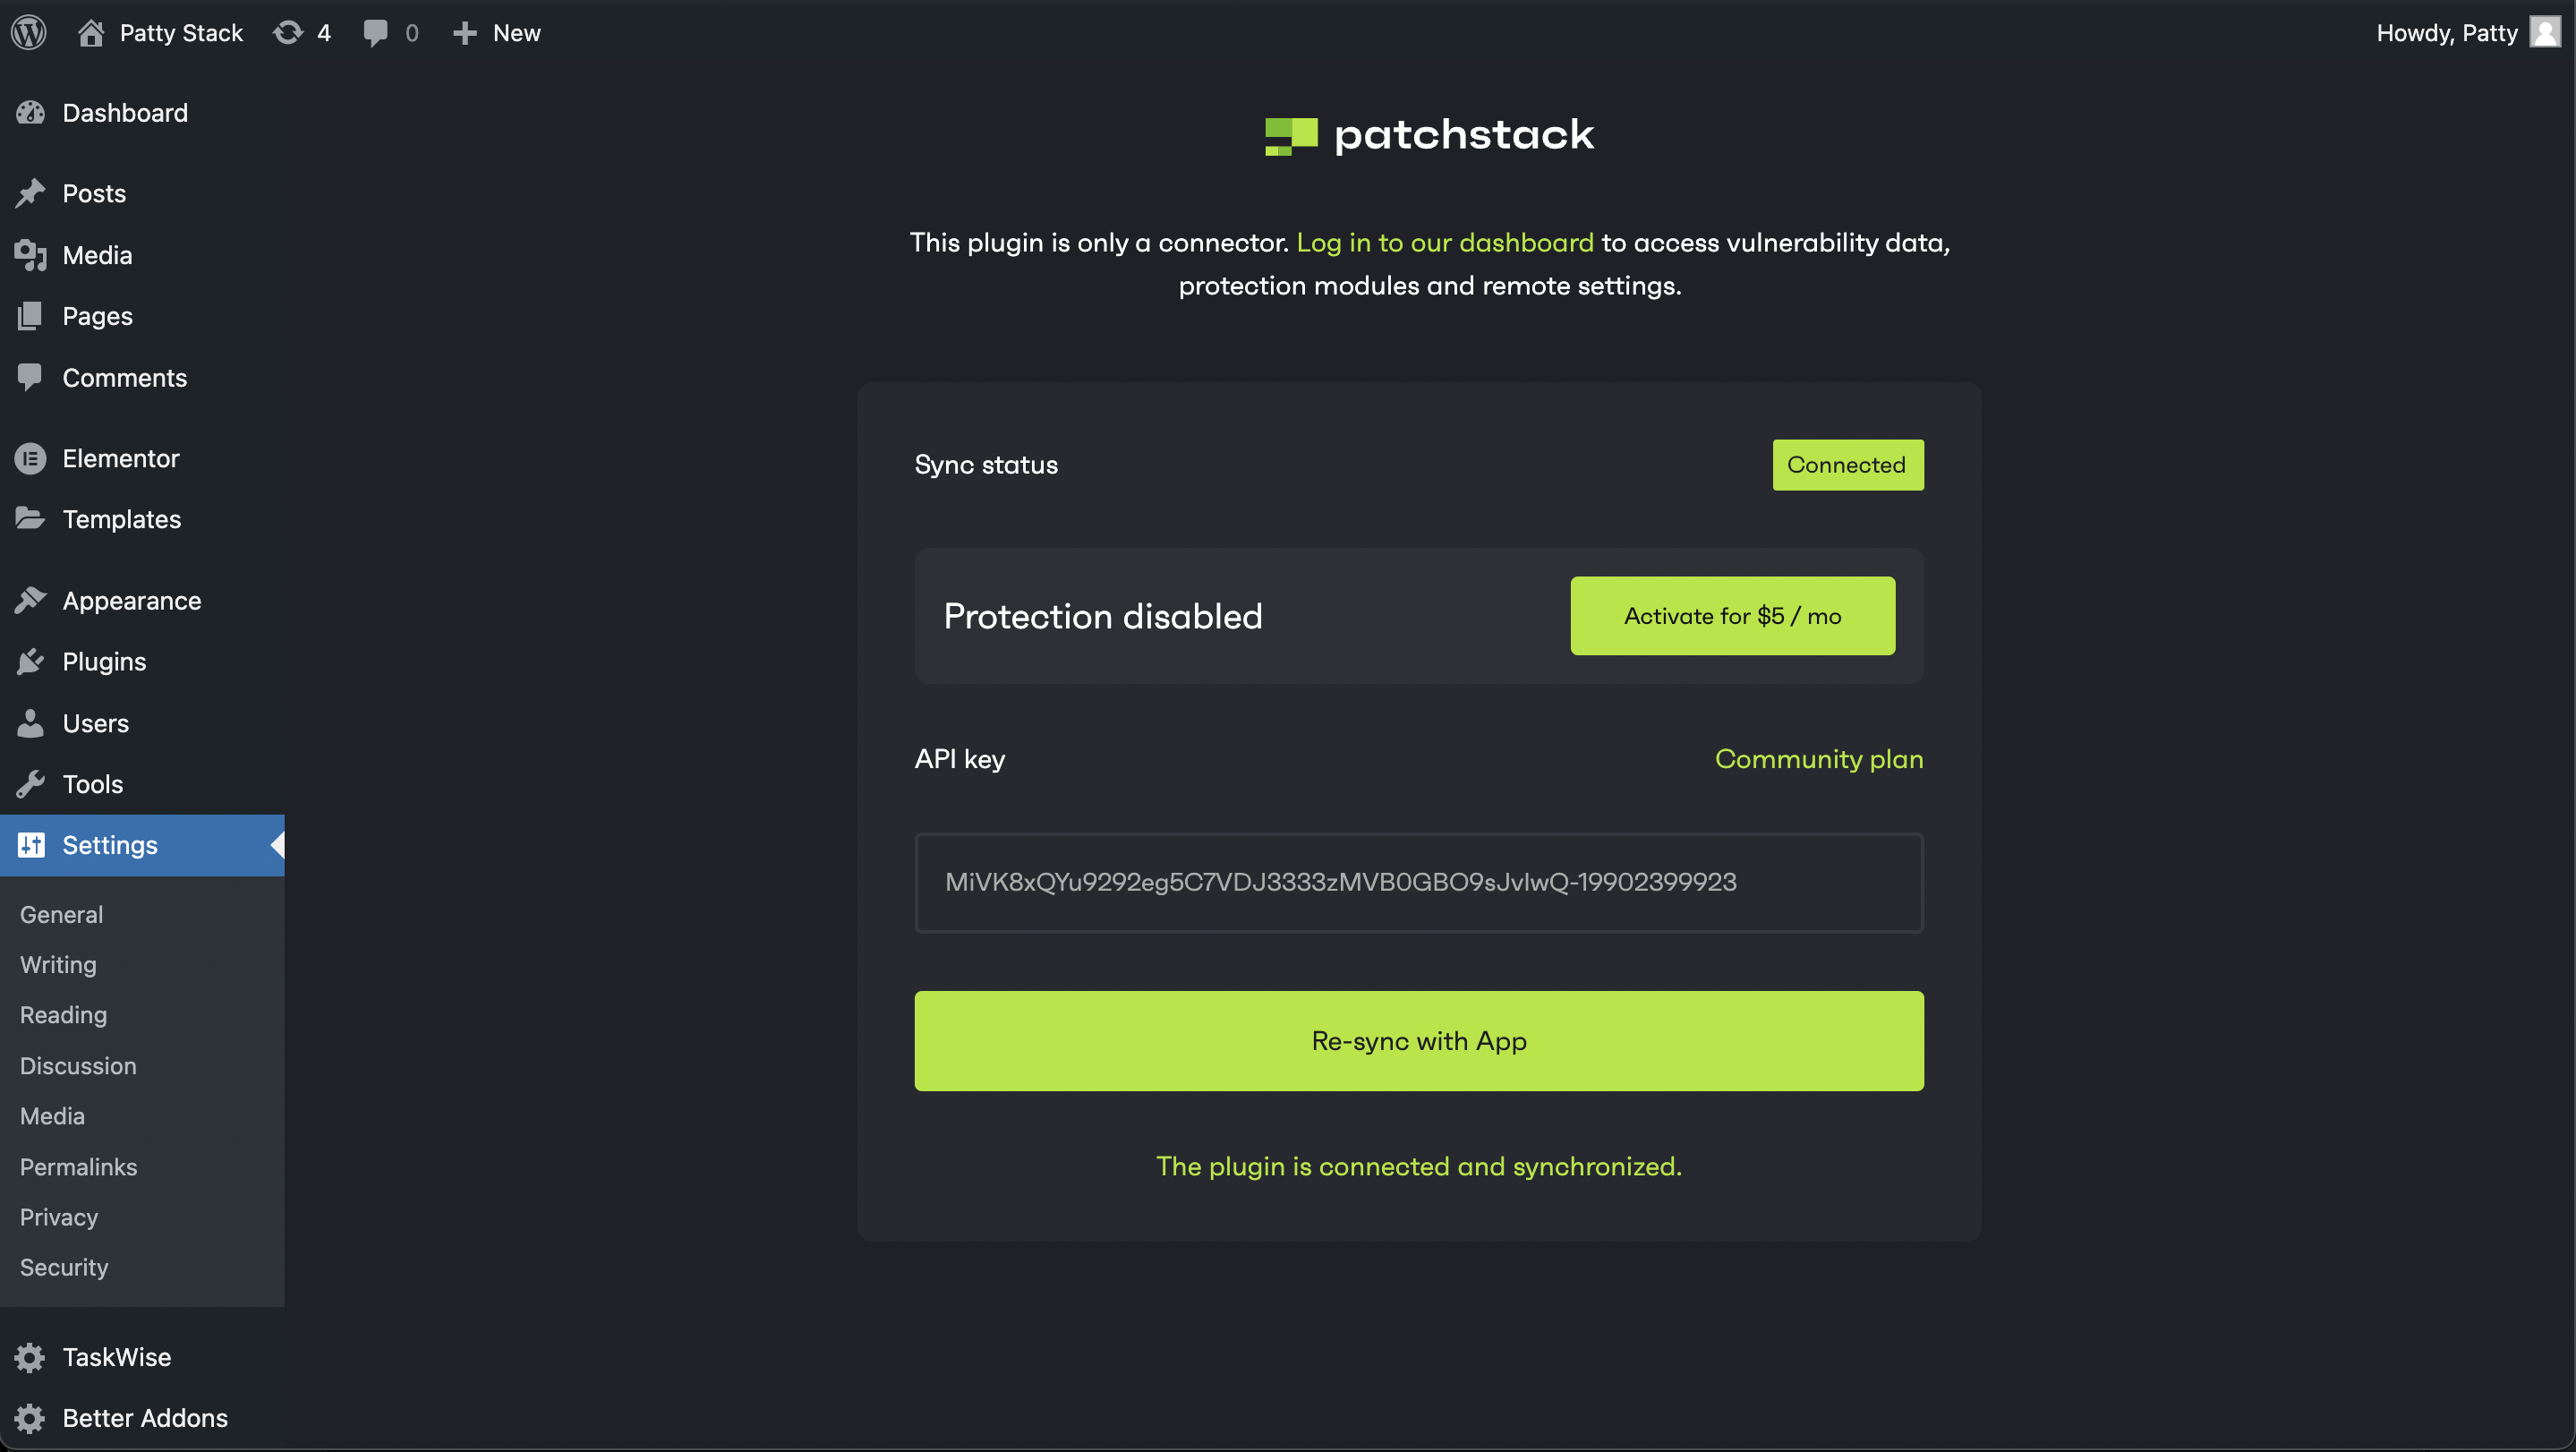
7. Patchstack App will now also automatically show the success message 
# Troubleshooting JavaScript / Node.js projects
This page covers the problems that come up after connecting a JavaScript or Node.js project with [`@patchstack/connect`](/getting-started/installing-patchstack/installing-on-javascript-node-projects/): a disclosure widget that never appears, a widget that appears twice, a published site still serving an old integration, a build that broke after a config change, and a connector stuck on an old version.
Every section ends with a **prompt you can paste into your site builder’s AI chat**. The prompts are deliberately explicit about proving the result, because builder assistants otherwise tend to report the version they remember, or stop after editing one file.
Start with the builder context
Paste the matching [builder context](#tell-your-builder-what-project-this-is) snippet above any prompt on this page. It is one short paragraph, and it is what stops the assistant from installing with the wrong package manager or declaring a slow build a failed one.
## Tell your builder what project this is
[Section titled “Tell your builder what project this is”](#tell-your-builder-what-project-this-is)
AI builders differ in which package manager they use and which controls they expose. Prepend the snippet for your platform to any prompt below.
**Lovable**
```text
This is a Lovable project. Inspect the existing lockfile before installing
anything. Lovable projects often use Bun; if bun.lock or bun.lockb exists, use
Bun and do not create a package-lock.json beside it.
```
**GoDaddy Airo**
```text
This is a GoDaddy Airo project. Make the changes in the project workspace and
use its existing package manager. If Airo does not expose the required install
or build control, tell me exactly which step is unavailable instead of
reporting that the task is complete.
```
**Hostinger Horizons**
```text
This is a Hostinger Horizons project. Use its existing package manager and allow
the dependency install and full production build to finish before checking the
result; do not treat a slow build as a failed one.
```
**Anything else, or not sure**
```text
First identify this project's package manager from its lockfile and use that
same package manager for every command. Do not create a second lockfile.
```
## The widget is not visible on my site
[Section titled “The widget is not visible on my site”](#the-widget-is-not-visible-on-my-site)
The floating **Report a vulnerability** button is hidden by default. If you installed the connector and never saw it, that is usually the reason rather than a broken install — work through these in order.
1. **Turn the public form on.** The visitor-facing button only appears when the widget is told to show it, either through the script tag:
```html
```
or from **Settings → Reporting → Display vulnerability reporting form** inside the widget itself.
2. **Open the widget as the site owner.** You do not need the public button to reach your own dashboard. Load any page of your site with `#patchstack` appended to the URL:
```text
https://your-site.com/#patchstack
```
That reveals the owner log-in even on a live production build, and it works from any device or network. `?patchstack` in the query string does the same thing.
3. **Check the script tag actually shipped.** View source on the published page (not the builder preview) and confirm there is exactly one script loading `https://cdn.patchstack.com/patchstack-widget.js`, with `data-site-uuid` set to the UUID from your committed `.patchstackrc.json`.
4. **Check the site UUID is a literal value.** The UUID must be written into the HTML. Reading it from `VITE_*`, `NEXT_PUBLIC_*`, or another environment-only variable that is not defined at build time leaves the attribute empty and the widget silent. The site UUID is public by design — it ships in client-side HTML and is not a secret.
5. **Check the widget was not disabled.** `"widget": false` in `.patchstackrc.json` turns off all widget management, and the next `scan` will not re-add the tag.
6. **Check the browser console.** A Content Security Policy that omits `cdn.patchstack.com` from `script-src`, or a content blocker, will stop the script from loading. Both show up as an error on the live page.
Frameworks without an HTML shell
`setup` manages the tag in the first of `index.html`, `public/index.html`, or `src/app.html` that exists. Next.js, Nuxt, SvelteKit, Remix and TanStack Start have no such file — they need a one-line placement in the root layout. Run `npx @patchstack/connect guide` for the exact snippet for your framework.
### Prompt: widget missing after publish
[Section titled “Prompt: widget missing after publish”](#prompt-widget-missing-after-publish)
Use this when the widget works in the builder preview but is absent from the published site.
```text
Please diagnose why the Patchstack widget works in preview but is missing from
the published site.
1. Use the latest @patchstack/connect release from npm.
2. Confirm the root page contains exactly one connector-managed script from
https://cdn.patchstack.com/patchstack-widget.js with data-site-uuid set from
the public .patchstackrc.json value.
3. Do not read the site UUID from VITE_*, NEXT_PUBLIC_*, or another
environment-only variable.
4. Run the connector setup/scan flow and the complete production build,
including mark-build where the project scripts require it.
5. Inspect the generated production output — not only source files — and verify
that the widget script and window.__PATCHSTACK_PROD__ marker are present.
6. Publish that verified output, then check the live page and browser console
for the first concrete error.
Please make the fix and show the production evidence. Thank you.
```
## The published widget still looks outdated
[Section titled “The published widget still looks outdated”](#the-published-widget-still-looks-outdated)
Your source can be correct while the builder or CDN is still serving an older artifact. Confirm the live URL — not the preview — is loading the current script, and compare the version the widget reports in each.
The widget shows its version in the owner dashboard. If preview and live disagree, the deployment is stale, not the code.
```text
Please verify that the published site is actually serving the newest Patchstack
integration rather than an older build artifact.
1. Confirm @patchstack/connect matches the current npm registry version,
including releases from the last 24 hours.
2. Confirm the site loads the Patchstack CDN script rather than a copied local
patchstack-widget.js file.
3. Run a clean production build through the project's normal build command and
wait for it to finish.
4. Republish the new output and invalidate only the relevant builder/deployment
cache if the platform exposes that control.
5. On the live URL, inspect the Network response for patchstack-widget.js and
the version shown by the widget. Compare that with preview and report both
values.
Please do not stop at a source-code check; verify the live deployment.
Thank you.
```
## Is this the latest connector version?
[Section titled “Is this the latest connector version?”](#is-this-the-latest-connector-version)
Site builders often resolve `@patchstack/connect` from cached package metadata and land on an older release. Check what npm actually has:
```bash
npm view @patchstack/connect version
```
Then compare it against what is installed. If they differ, install `@patchstack/connect@latest` with the package manager that matches your lockfile.
```text
Please update @patchstack/connect from the official npm registry. Use the
latest version available right now, including a release published within the
last 24 hours. Please do not rely on a remembered or cached version.
1. Query npm for the current dist-tag with: npm view @patchstack/connect version.
2. Install @patchstack/connect@latest as a regular dependency with the package
manager already used by this project.
3. Confirm the exact installed version using the package manager and
@patchstack/connect --version.
4. Run the project's complete production build.
5. Tell me the registry version, installed version, files changed, and final
build result. Do not say it is current unless the two versions match.
Please make the changes and verify them. Thank you.
```
## The build broke after a config update
[Section titled “The build broke after a config update”](#the-build-broke-after-a-config-update)
The connector uses two config files with different jobs, and mixing them up breaks the build:
| File | Commit it? | Holds |
| -------------------------- | ----------------- | -------------------------------------------------------------- |
| `.patchstackrc.json` | Yes | The public `siteUuid` and non-secret settings such as `widget` |
| `.patchstackrc.local.json` | No — gitignore it | `apiKey` only |
The API key can also come from the `PATCHSTACK_API_KEY` environment variable. Never import it into browser code and never move it into the public config.
```text
Please diagnose and fix the Patchstack build after the config-file update.
1. Update @patchstack/connect to the latest npm version first, even if it was
released within the last 24 hours.
2. Search the entire project for .patchstackrc.json and
.patchstackrc.local.json, including build scripts and generated integration
code.
3. Keep the public siteUuid and non-secret settings in committed
.patchstackrc.json.
4. Keep apiKey only in gitignored .patchstackrc.local.json or
PATCHSTACK_API_KEY. Never import that secret into browser code or move it
into the public config.
5. Fix any stale code path that still expects the credential only in
.patchstackrc.json, while preserving the site UUID.
6. Run Patchstack status, scan, and the complete production build. Report the
root cause, exact files changed, and build output.
Please complete and verify the fix. Thank you.
```
## I see two Patchstack widgets
[Section titled “I see two Patchstack widgets”](#i-see-two-patchstack-widgets)
Two shield buttons stacked in the corner, sometimes one opening the owner log-in and the other the report form, mean the widget script ran twice on that page. They often sit on exactly the same pixel, so the second one only shows when a panel opens or the layout shifts.
The widget keeps **one floating launcher per page** on its own:
* A second copy loaded by the **same document** is ignored, with a `[PatchstackWidget]` warning in the browser console.
* A copy inside a page of **your own site that the shell shows in an `